With the release of iTop Voicy, iTop has changed the standards of voice creativity once again. iTop Voicy is a voice changer and an audio enhancer all in one software, compatible with Windows. Voice-altering in real-time can help add more personality to your gaming and bring your livestreams to another level. If you need to sound more professional in meetings or have a need for unique voice acting on your videos, iTop Voicy gives you a clear and non-laggy voice change. This Tutorial will go through how to install the software, configure your audio, analyze the preset voices, make your own, and add special sounds. The software even gives you the ability to record and manage your library of voices.
Install, Set Up, and Configure Your Audio
After the software has been successfully installed, open iTop Voicyand permit access to the microphone, as this will enable the software to respond to your voice in real-time.
This panel should be the first one you visit. Make the right choice of input microphone and output speaker or headset. If the audio routing is not set up correctly, you may experience some delay or quality degradation. With the best configuration, iTop Voicy instantly processes your voice with high quality and minimal delay.
If you want your transformed voice to be heard across platforms like Discord, Zoom, Google Meet, OBS, or games, manually choose iTop Voicy as the input device in those apps. This is essential for smooth cross-software compatibility and prevents your PC from switching back to the default microphone.
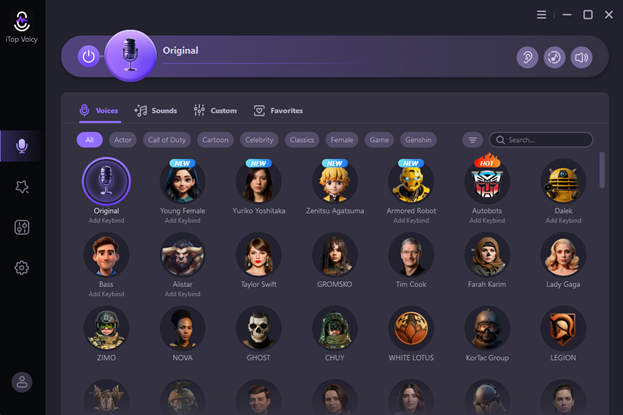
Changing Your Voice in Real Time Using Presets
ITop Voicy features an impressive real-time voice-changing engine. You just select a voice from an extensive collection of voice types—male, female, robotic, cartoonish, epic, horror, and many others.
Once you select your preset, the engine will transform your voice in real-time. This voice changer is designed to be a voice modifier for gaming, roleplay, online chatting, and live streaming. You don’t have to change any settings in the voice modifier. You choose a preset and then talk. This lets new users get to voice modding instantly. For voice-over specialists, you have a large range of voices to modify to fit different customizations.
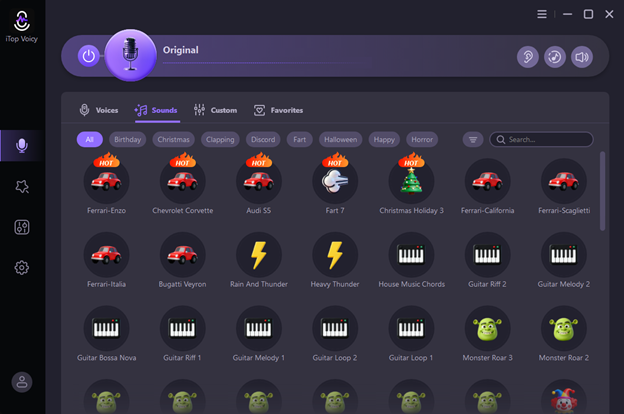
Adding Extra Sound Effects for Live Sessions
In addition to modifying one’s voice, the program included the ability to integrate additional sound effects in real-time, which is useful for improving audio for current streams or enhancing entertainment value.
These effects might include wind, thunder, and voice overlays in addition to ambient backgrounds, among various added dramatic sound effects to be played for theatrical or comedic exaggeration in streams. With the push of a button, a streamer or gamer is able to significantly enhance the audio entertainment and role-play within a real-time scene or for various portions in a streaming production.
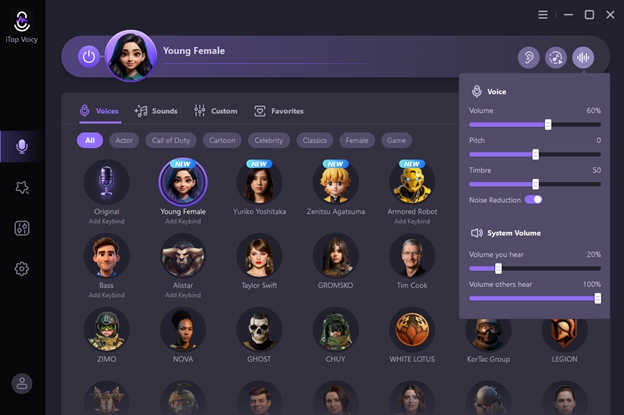
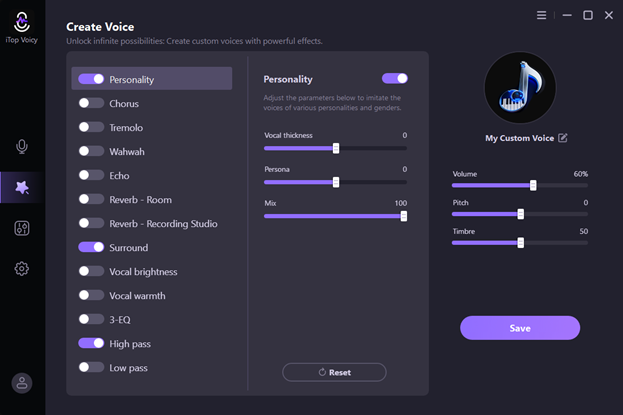
Crafting Your Own Voices Using Custom Voice Controls
The Custom Voices panel is equipped with advanced editing tools for those who prefer finer control. Here, users have the option to craft an entire voice identity from the ground up or to adjust one of the voice presets available.
Modify voice properties here, such as:
Pitch — Heighten or lower the voice
Timbre/Formant — Alter the voice’s quality
Emotion & Strength — Add varying expressiveness to the voice, or keep it neutral
Additional FX — Add echo, clarity, reverb, or texture
These features are great for those looking to create unique voice avatars for storytelling or character performance, ASMR, content creation, or even a professional voiceover.
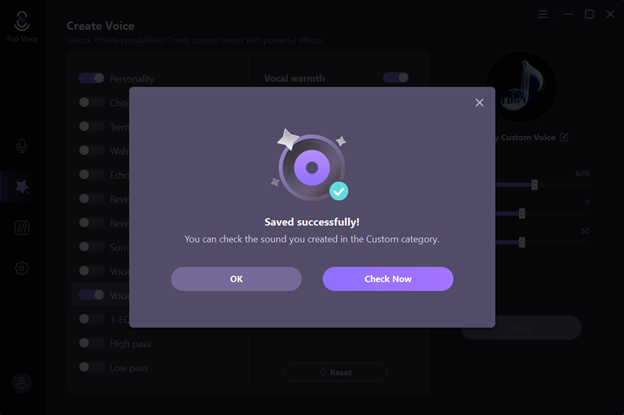
Once you finish creating or refining your custom sound:
All custom-created voices are stored in this section. You can name, categorize, and quickly change voices during live sessions. This is very helpful when you have to play different characters or change your personality during a stream.
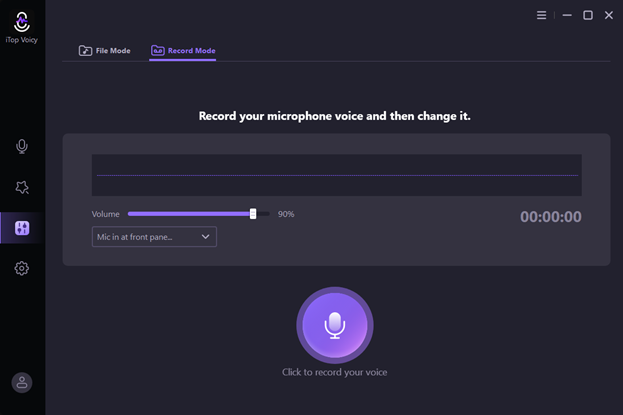
Recording, Re-Voicing, and Editing Audio
Not just a voice changer, iTop Voicy is also a audio recorder. You have the ability to:
Change your voice in real time
Perform scripted lines
Alter pre-existing voice recordings
Provide voiceovers for video characters
Generate videos for social media
Once the audio is recorded, you can save the audio file and use it in editing software, or you can upload the file to social media. This feature allows the platform to be described as a comprehensive audio studio and not just as a real-time voice moderator.
Tips for Smooth Performance and Better Results
To maximize your use of this free voice changer application, you should consider performance enhancement suggestions such as the following:
Ensure you have a studio-quality USB microphone to obtain a high-quality input signal
Pre-record your effects to test them out before your performance stream begins
Sign out of other applications to prevent a CPU bottleneck
Create folders to expedite your preset arrangement for quicker menu navigation
Modify the background noise settings to avoid threshold clipping for a cleaner audio signal
These refinements lead to a substantial enhancement of the overall quality of audio recordings, as well as the quality of audio being streamed live.
Responsible, Safe, and Ethical Usage
Although voice-changing tools are entertaining and amusing, they are to be applied in a reasonable manner. Do not pose as actual people and deceive other people. When using voice based on a character or celebrity, be sure that it is in line with the rules of the platform and legal considerations of copyright. Moral exploitation keeps creators and viewers safe.
Conclusion
iTop Voicy provides the entire rich voice-altering experience, including the instruments of real-time effect, preset voice, custom voice-making technology, sound effects, and an in-built recording. When properly configured and used with presets and custom tools, anyone, including amateur gamers and content developers, can create different voices that are unique and expressive. No matter whether you are streaming, dubbing videos, role-playing characters, or just facing the computer screen to have fun, we give you the flexibility and the creative power to make your voice instantly and professionally better during moments where you need it.
Digital tools used to feel like shortcuts. Now they often feel like detours. Websites demand logins for things that used to be one-click tasks. Apps force tutorials before letting you use them. Passwords expire weekly. It’s no surprise users want less friction and more flow. The push toward seamless digital interaction isn’t a trend anymore—it’s a demand. In this blog, we will share how tech is responding and what it means for daily life.
From Clicks to Flow: What Seamlessness Actually Means
Seamless interaction means using digital tools without second-guessing or stopping to think. No figuring out what a button does. No waiting five seconds for a page to load. No signing in five times to do one thing. It’s that clean feeling when you use a service and everything just… works.
For people dealing with work-from-home burnout, digital clutter, and constant alerts, smoother tech isn’t a luxury—it’s survival. That’s why companies are stripping back their interfaces, tightening up user flows, and integrating features that remove the need for any manual effort at all.
AI plays a massive role here. Voice assistants like Alexa or Google Assistant have stopped being novelties. They’re now core interfaces in homes, skipping visual clutter altogether. Predictive text and autofill make writing emails less painful. Smart home systems adjust lighting and temperature without anyone lifting a finger.
And the broadband behind all this? It matters more than ever. That’s where services like Smartmove Internet have stepped in. With people relying on connectivity not just for entertainment but for security systems, remote work, and smart appliances, Smartmove gives households stable, fast, no-nonsense connections. The difference isn’t just in speed. It’s in the way good internet makes everything else run smoother—from morning video calls to late-night streaming.
Seamlessness isn’t about flashy new devices. It’s about invisible improvements. It’s the coffee machine starting because your alarm went off. The grocery list syncing with your fridge. The reminder popping up at the exact time you’d forget. The less you notice the system, the better it’s working.
When “Frictionless” Becomes the Baseline
Remember when fingerprint unlocks on phones felt like sci-fi? Now we roll our eyes if it lags by a second. Digital ease is no longer a nice-to-have—it’s expected. Which creates a weird tension: the smoother things get, the less patient we are with friction.
Companies are learning this the hard way. Clunky websites, buggy apps, and endless sign-ups get ditched fast. Every extra screen or broken flow is an exit point. That’s why you’re seeing more autofill forms, passwordless login, and gesture-based UI.
Take Apple’s Vision Pro. It isn’t just a headset. It’s part of a bigger push to erase the border between physical and digital space. Eye movement becomes a click. The idea? No tools between you and your task. It’s still early, and the price tag is laughable for most, but it sets a tone: hands-free, mindless navigation is where we’re headed.
Even banks—usually the last to evolve—are in on it. Facial recognition at ATMs. Tap-to-pay everywhere. In some cities, your face or palm replaces your metro card. These aren’t gimmicks. They reduce wait times, shorten lines, and let people move.
But here’s the flip side: systems that know too much. Frictionless tech needs data. The more it guesses what you want, the more it watches. Every automated suggestion comes from collected behavior. Smoothness has a cost. Convenience trades privacy for speed.
Real-World Expectations, Digital Standards
Go order a burger from a touchscreen at a fast-food joint. It’ll remember your last order, skip steps you don’t use, and suggest your usual sides. Now go to a healthcare site to schedule an appointment. You’ll likely face a login, a CAPTCHA, a six-step form, and a delayed confirmation email.
This gap—between consumer tech and institutional tech—is glaring. And it’s closing. Hospitals are building portals with app-like speed. Government services are moving toward single-click ID systems. The IRS isn’t exactly Apple, but even they’re experimenting with video chat support and simplified interfaces.
Retail’s ahead of the game. Amazon’s “Buy Now” button kills extra steps. Walmart’s app walks you to the right aisle. Nike lets you try shoes virtually before purchasing. These features don’t just save time. They raise expectations. Once people taste effortlessness, they want it everywhere.
If the DMV is still asking for paper forms in 2025, it’s not just outdated—it’s infuriating.
The Danger of Over-Automation
There’s a point where frictionless becomes eerie. When Spotify autoplay finishes your breakup playlist with more heartbreak songs, it feels helpful. But when your car starts driving itself and chooses a longer route without asking, that’s when the trust wobbles.
Seamless isn’t supposed to mean powerless. Over-automation creates a weird passive role for users. You don’t ask. You’re just served. If the system is wrong, there’s no clear way to fix it.
Take social media. Auto-curated feeds show you what algorithms think you want. But they also trap you in loops—showing more of what kept your attention, not what you might actually need. You’re not navigating the platform. It’s navigating you.
And when AI chatbots run customer service? Sure, they reduce wait times. But try explaining a niche issue to one, and you’ll hit a wall. The illusion of control collapses fast.
Seamlessness must leave room for override. Friction can be good when it gives users options or slows them down for big decisions. You don’t want a one-click divorce button. Or an AI that books a flight without asking if you’re free that weekend.
The goal isn’t zero input. It’s thoughtful design. Tech should support instincts, not replace them.
What’s Next and What to Watch
Seamless interaction isn’t the finish line. It’s a moving target. As tools improve, user tolerance drops. Even milliseconds of lag become unacceptable. Think about the last time a streaming video buffered—didn’t you groan like it was the end of the world?
Next-gen systems are heading toward context-aware computing. Not just reacting to what you do, but where you are, what time it is, who you’re with. Wearables that detect your stress and tweak your environment. Homes that dim lights when you’re anxious. Phones that know when not to ping you.
But there’s a catch. If everything adapts to you, does anything challenge you? There’s value in being bored, in struggling through a process, in choosing. Seamlessness makes interaction feel lighter, but it also shapes habits.
If every interaction gets boiled down to “tap here,” people might lose patience for anything slower or more complex. That’s a social shift worth watching. Especially as kids grow up expecting their devices to guess what they want before they want it.
Technologists face a real balancing act: build systems that feel intuitive, but not controlling. Automate routines, but not thinking. Keep users at the center, not under the thumb of their tools.
Seamless digital interaction is the future, but it has to keep humanity in the loop. Otherwise, we’re not using tech—it’s using us.
When you begin thinking about expanding your project globally, итак, the first idea that comes to mind is using powerful infrastructure abroad. And here, you, as a website or application owner, inevitably face the question: how to correctly rent a server in the USA and not make a mistake? Although many people start with cloud hosting, a dedicated server USA often provides more stability and performance. Compared to basic VPS solutions, a physical server gives you far more control—and you feel the difference from day one.
Understanding Why a U.S. Server Matters
Let’s imagine a situation: давайте рассмотрим ситуацию, your audience is located in North America, and you want your platform to load instantly. You quickly realize that if you rent server capacity closer to your users, the delay decreases significantly. You might consider European hosting, but the speed gap between the U.S. and EU for American visitors is noticeable, and you would definitely sense it in real traffic metrics.
What You Should Focus On Before Renting a U.S. Server
Before you rent dedicated server hardware, you must determine what exactly your project needs. For example, if you run an online store, you (yes, you—as the decision maker) need stable CPU performance more than massive storage. However, if your project is a video library, storage becomes a priority. In comparison with typical shared hosting, a server rental in the USA gives you complete freedom to choose components according to your needs, not the provider’s limitations.
CPU, RAM, and Storage: Choosing the Right Specifications
Итак, for most modern projects, the heart of the server is its CPU. Let’s say вам необходимо handle large analytical workloads. In that case, selecting an Intel Xeon Gold or AMD EPYC will make a real difference. If instead you manage simple backend tasks, a mid-range Xeon is more than enough. The comparison here is simple: a stronger CPU gives you power, while a balanced CPU saves money without losing performance.
Next is RAM. You may need 32 GB for a standard backend, but 64–128 GB if your application caches huge datasets. When comparing RAM needs for different projects, you’ll see how memory-heavy environments like databases simply cannot function well with low RAM.
Finally, storage: SSD vs. NVMe. You, as the project owner, must remember that NVMe drives outperform SATA SSDs dramatically. So if speed matters, NVMe wins every time.
Network Speed and Traffic: What You Really Pay For
Now давайте рассмотрим ситуацию: your service streams content or processes real-time requests. In this case, network bandwidth is your lifeline. U.S. servers often offer 1–10 Gbps ports. Compared to European servers, American data centers tend to provide faster routes to North and South America, which can be crucial if your customers are located there.
Additionally, many providers charge for traffic, while others offer unmetered plans. When comparing these options, you’ll notice that unmetered bandwidth sometimes costs more upfront but saves significant money long-term.
Location: Which U.S. City Should You Choose?
When you rent server hardware in the USA, the physical city matters. For example, choosing New York gives excellent connectivity to Europe and the East Coast. Los Angeles, in comparison, benefits Asia-Pacific users. Chicago stands out as a balanced, central location with low latency nationwide. You should choose based on your real audience—not just price.
Security: What You Must Not Ignore
Imagine: например вам необходимо store sensitive client data. U.S. data centers typically offer stronger compliance standards such as SOC 2 and HIPAA. Compared to cheaper offshore hosting, the USA provides significantly higher legal protection and more transparent service-level agreements. You, as a business owner, should prioritize this if you handle financial or medical information.
How to Correctly Configure a Dedicated Server USA
Now let’s walk through the correct step-by-step process you should follow:
Assess project requirements – Compare CPU/RAM/storage needs with the project goals. – You versus the provider: you understand your workload, the provider offers options—you must find the balance.
Choose the data center region – East Coast vs. West Coast: compare latency based on where your users live.
Set your budget – Итак, remember that server rental price depends on hardware, bandwidth, and additional services.
Select additional features – Backups, IP addresses, DDoS protection. – Comparing packages, you’ll see that some providers bundle features, while others charge extra.
Set up access and monitoring – You must have SSH or remote console access. – Compared to shared hosting, you manage the entire machine yourself.
A Reliable Provider Example — DeltaHost
When you are ready to rent dedicated server infrastructure in the USA, it’s important to choose a company with a good reputation. One such provider is DeltaHost, which offers quick deployment times, stable network connectivity, and a wide range of hardware configurations. Their service page at 👉 https://deltahost.com/dedicated.html contains detailed specs and transparent pricing, which you, as a potential customer, will find extremely useful.
Compared to many competitors, DeltaHost provides better customization options and more predictable pricing, which is a major advantage when planning long-term operations.
Real-Life Example: Choosing the Wrong Specs vs. Choosing the Right Ones
Давайте рассмотрим ситуацию: imagine you rent a server with only 16 GB of RAM because it seems cheap. You deploy your applications, traffic grows, and suddenly the machine starts swapping. You realize you should have invested a bit more from the start. Now compare that scenario with choosing 64 GB initially—you spend more upfront, but save yourself from downtime, migrations, and customer complaints.
When Should You Upgrade?
You, as a project owner, should constantly monitor CPU load, memory consumption, and I/O wait times. If your metrics spike frequently, you must upgrade. Compared to local hosting or VPS plans, a dedicated server USA lets you scale hardware much more efficiently, often without moving to another platform.
Final Thoughts: Making the Right Choice
Итак, renting a server in the USA is not as complicated as it seems, but only if you approach it correctly. When you rent server hardware abroad, remember to match specifications to your real workload, choose the right city, compare network bandwidth, and evaluate security features.
Compared to randomly selecting the cheapest option, a thoughtful strategy gives you better performance and long-term stability. You must treat this as an investment in your business, not a simple expense. And when you finally decide to rent dedicated server equipment from a trusted provider like DeltaHost, you gain not only power—but also confidence in your infrastructure.
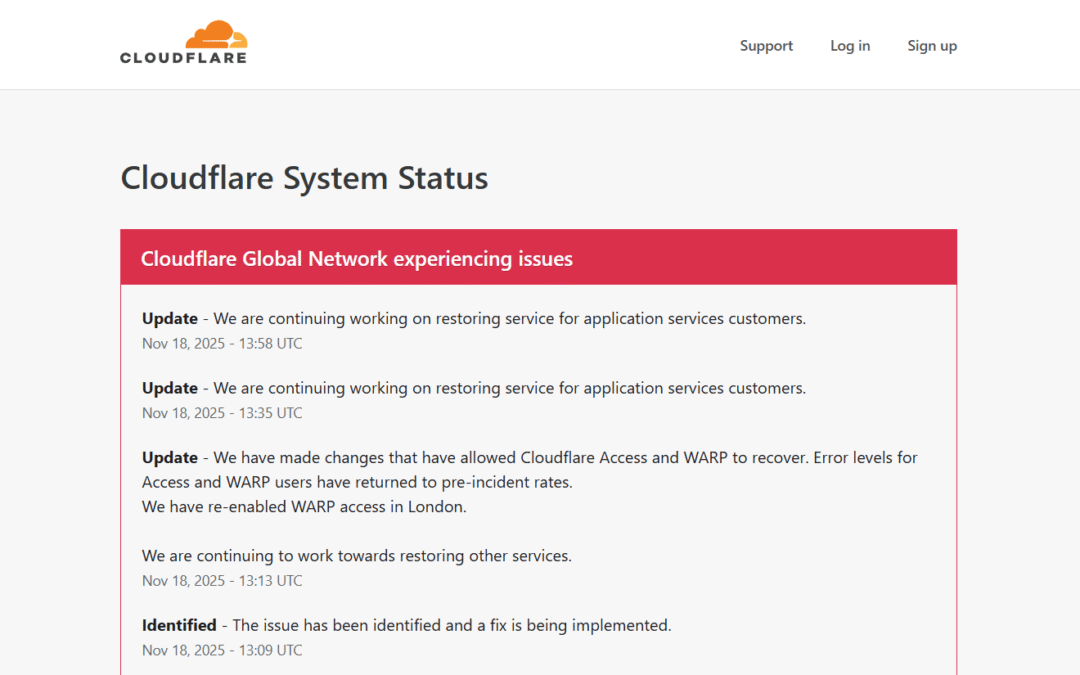
The recent Cloudflare outage on November 18, 2025, wasn’t just another blip on the digital radar; it was a full-scale, worldwide internet heart attack. For several crucial hours, huge chunks of the web simply ceased to function, leaving millions of users staring blankly at frustrating “500 Internal Server Error” messages. When we talk about global network disruption, we often think of massive, deliberate attacks or natural disasters, but this time, it was an internal technical failure at a single, supremely critical company that triggered a global cascading failure. Cloudflare, for the uninitiated, is essentially the central nervous system for a massive portion of the modern internet. When a provider of this magnitude stumbles, the impact is instantaneous and pervasive. It wasn’t just niche sites that went dark—it was the platforms we rely on every minute, from social media giants like X (formerly Twitter) to cutting-edge AI services like ChatGPT. This event wasn’t merely inconvenient; it was a stark, sobering reminder of how critically interconnected—and perhaps overly centralized—our digital lives have become. This analysis will walk you through the technical guts of what went wrong, detail the massive collateral damage across the globe, and discuss the uncomfortable lessons we all need to absorb from this digital chaos. We’ll dive into why a single company holds this much sway and what this means for the future resilience of the web. This is the story of the day the internet collectively stalled.
This section details the specific failures that took place on November 18, 2025, and how Cloudflare engineers scrambled to diagnose and resolve a problem that was simultaneously local to their systems and global in its effects.
A. The Technical Root Cause of the Widespread 500 Errors
When the outage first hit around 11:20 UTC, the initial messages coming from the web—and from Cloudflare’s own status pages—were cryptic. What users saw were “Widespread 500 errors.” This is a generic HTTP status code that translates to, “Something went wrong on the server, but the server couldn’t be more specific.” In the context of the Cloudflare disruption, it meant the company’s edge infrastructure—the network of servers closest to the end-users—was unable to process requests for the millions of websites it proxies.
Sub-Section: Initial Detection and Timeline of the Incident The timeline released by Cloudflare indicated that the incident began around 11:20 UTC (6:20 AM ET) when they detected a sudden and “unusual traffic spike” targeting one of their internal services. This immediate influx of traffic wasn’t an external DDoS attack; it was a self-inflicted wound, a rapid internal service degradation that overloaded a critical piece of their routing infrastructure. Within 30 minutes, the issue had snowballed into a global catastrophe. Cloudflare’s engineering teams jumped into a full “all hands on deck” response, but even for a company built on speed and redundancy, stabilizing a core internal service under such immense pressure takes time.
Sub-Section: The Role of Scheduled Maintenance and Traffic Rerouting Interestingly, Cloudflare’s public status page showed that a scheduled maintenance window was in progress at their Santiago (SCL) datacenter between 12:00 and 15:00 UTC on the same day. While the company stated the global outage was due to an “internal service degradation,” the combination of scheduled maintenance that could reroute traffic and an unexpected internal traffic spike raises important questions about the overall system load and timing. Did the rerouting of traffic due to the Santiago maintenance contribute to the spike? Did the systems handle the failover process correctly? While the official root cause was the internal traffic event, the simultaneous maintenance shows that even routine, controlled changes can expose hidden fragilities in complex, highly interconnected systems, a factor that will undoubtedly be scrutinized in their post-mortem report.
Sub-Section: Widespread 500 Errors: Analyzing the Server Failure Response The 500 error messages were the universal sign of the failure. For those of us using the internet, it meant an immediate wall. For developers, it signaled a failure in the application’s backend or, in this case, the infrastructure layer in front of the backend. Since Cloudflare sits as a reverse proxy, security provider, and content delivery network (CDN) for its clients, it receives the request first. The internal failure meant that Cloudflare’s systems couldn’t effectively route the request to the client’s origin server, nor could they serve cached content or perform necessary security checks. Essentially, the request died at the Cloudflare edge, resulting in the dreaded 500 message across thousands of unrelated websites. This is the definition of a single point of failure in action, where the traffic manager itself became the traffic bottleneck.
B. Impact on Cloudflare’s Own Infrastructure
The problem wasn’t just that Cloudflare’s customers were experiencing issues; Cloudflare’s own systems were also crippled by the internal degradation, which significantly hampered their ability to respond.
Sub-Section: Cloudflare Dashboard and API Failures When a network operator needs to fix a global issue, they need their command center, or “control plane,” to be fully operational. During the November 18 outage, Cloudflare’s Dashboard and API suffered significant failures. For customers, this was extremely frustrating: they couldn’t log in to change settings, pause Cloudflare, or even view their analytics. More critically, for Cloudflare’s internal teams, a failing API meant that deploying fixes, rolling back changes, or rerouting traffic manually became exponentially harder. The situation echoes similar prior outages (like the one in September 2025, which was specifically a dashboard/API bug) and shows that the control plane remains a highly vulnerable, single point of failure within their own architecture. If you can’t access the controls, you can’t steer the ship out of the storm.
Sub-Section: Disruption of WARP and Access Services Beyond their core CDN and security offerings, Cloudflare’s newer services like WARP (their consumer VPN/connectivity service) and Access (their Zero Trust security platform) were also immediately impacted. Cloudflare specifically noted that they had to temporarily disable WARP access in London during their remediation efforts as they struggled to stabilize the network. The subsequent success in quickly restoring these services—often cited as the first to return to pre-incident error rates—provided an early sign that their overall efforts were working, but the initial failure highlights the interconnectedness of their service offerings. For thousands of remote workers and enterprises that rely on Access for secure network entry, this downtime meant an immediate and total halt to business operations.
Global Impact: Which Major Platforms Were Affected?
The sheer scale of the disruption shows just how central Cloudflare has become to the modern digital ecosystem. If you had an internet presence of any significant scale, odds are you use Cloudflare for speed, security, or DNS, and you were affected.
A. Social Media and Communication Services
The most immediate and visible chaos erupted across platforms that thrive on real-time communication, leading to mass user frustration and communication breakdowns globally.
Sub-Section: X (Formerly Twitter) Outage: User Frustration and Communication Breakdown The social media platform X, a constant source of news and real-time interaction, was one of the highest-profile casualties. Users globally reported issues with loading their timelines, inability to post new content, and frequent login errors. For many, X is the primary source of immediate global news, and its downtime created a momentary communication vacuum. The irony was thick: people couldn’t use X to complain about the outage, forcing them to turn to alternatives (many of which were also down) or simply refreshing the page in desperation. The intermittent nature of the failure—sites like X came back online temporarily before suffering further problems—only amplified the frustration, as brief moments of hope were quickly dashed by renewed 500 errors.
Sub-Section: The Downtime for ChatGPT and OpenAI Services The disruption didn’t spare the artificial intelligence frontier either. OpenAI’s groundbreaking ChatGPT service, along with other related OpenAI APIs and tools, faced significant downtime. As AI rapidly integrates into daily business and education, the inability to access ChatGPT became a major productivity hit. Students couldn’t finish homework, developers lost access to coding assistance, and businesses relying on AI-powered customer service saw critical tools fail. This specific failure underscores a new vulnerability for businesses: not only are they reliant on their own infrastructure and CDN, but they are also reliant on the uptime of third-party AI services, many of which also use Cloudflare. The outage proved that the digital supply chain has extended far beyond basic hosting and into the realm of intelligent services.
B. Entertainment and Financial Platforms
The breadth of the failure extended into the recreational and financial spheres, demonstrating that almost no digital sector is immune.
Sub-Section: Streaming and Media: Spotify, Letterboxd, and More For millions around the world seeking distraction or entertainment, the outage was a mood killer. Streaming giant Spotify, the primary source of music for many, experienced significant access issues and slow loading times. Film review aficionados on Letterboxd found themselves unable to log their latest movie ratings. The fact that platforms offering such diverse services—from high-bandwidth audio streaming to niche social movie logging—were all affected simultaneously is the defining feature of a Cloudflare-centric disruption. The common denominator was simply the invisible Cloudflare backbone.
Sub-Section: Business and Financial Services: PayPal, Sage, and bet365 Perhaps the most worrying impact was on financial and business services. While critical banking infrastructure is typically insulated, payment processing and business software platforms felt the heat. Reports indicated that PayPal, a colossal player in e-commerce, experienced issues, halting transactions for thousands of online stores. Similarly, business software providers like Sage and popular betting services like bet365 were also disrupted. For these companies, downtime doesn’t just mean a few frustrated users; it means lost revenue, halted payroll runs, and severe financial consequences. The ability of a CDN outage to directly impact the flow of global commerce serves as a major warning shot to the entire financial technology sector.
The Significance of Cloudflare in the Modern Internet
To truly grasp the magnitude of this disruption, we need to understand exactly what Cloudflare does and why so many businesses rely on it. It’s not just a hosting company; it’s an invisible layer of internet defense and speed.
A. What is Cloudflare? (CDN, DNS, and Security)
Cloudflare operates as a massive network of servers distributed across 300 cities in over 120 countries, sitting between a website’s origin server and the end-user. It provides three primary, critical services:
Content Delivery Network (CDN): This is perhaps its most famous function. Cloudflare caches static content (like images, CSS files, and JavaScript) on its edge servers close to the user. This means when you visit a website, the content doesn’t have to travel across continents from the origin server; it’s served instantly from a nearby Cloudflare server. This dramatically increases website loading speeds.
Domain Name System (DNS): Cloudflare runs one of the world’s most popular DNS services (1.1.1.1). DNS is the phonebook of the internet, translating human-readable website names (like google.com) into computer-readable IP addresses. Cloudflare’s DNS is fast and resilient, making it a critical foundation for web routing.
Security and DDoS Mitigation: Cloudflare acts as a web application firewall (WAF) and DDoS shield. It filters out malicious traffic, bot attacks, and denial-of-service attempts before they ever reach a client’s origin server. It’s the digital bouncer and bodyguard for millions of websites, protecting them from being overwhelmed by bad actors.
Because companies often bundle these services, relying on Cloudflare provides a single, high-performance solution for speed, routing, and defense. This efficiency is Cloudflare’s massive selling point, but it’s also the source of the internet’s current fragility.
B. Single Point of Failure: The Risk of Centralized Infrastructure
The Cloudflare outage, like those that occasionally hit Amazon Web Services (AWS) or Microsoft Azure, highlights the profound risk of centralizing the internet’s backbone. When a large percentage of global web traffic, security, and DNS resolution flows through a handful of mega-providers, a failure in any one of them creates an unavoidable single point of failure.
Imagine all major roads in a country routing through a single, central junction. When that junction shuts down, traffic across every spoke of the road network grinds to a halt—even if the individual destinations were fine. Cloudflare is that junction. For companies, relying on Cloudflare is efficient and cost-effective, but for the internet as a whole, it creates a massive systemic risk. The November 18 incident didn’t require an external threat; an internal traffic surge was enough to prove that too many critical services have put all their routing eggs in one high-availability basket. This incident should accelerate the internal discussion within every major technology company about the necessity of multi-CDN and multi-DNS strategies to ensure true redundancy and prevent future cascading failures of this scale.
Resolution and Remediation
The return to normalcy was a grueling, hour-by-hour fight fought by Cloudflare’s engineers, followed by the inevitable corporate reckoning.
A. Remediation Efforts and Timeline to Recovery
Cloudflare’s team rapidly implemented a fix after identifying the root cause—the unusual internal traffic spike—around 1:09 PM UTC. The process of recovery, however, was not instantaneous. Cloudflare employs a global network with complex state, and stabilizing it requires careful, phased steps to avoid a “thundering herd” effect (where too many services try to reconnect at once, causing a second wave of overload). The first signs of recovery were seen in the return of internal services like WARP and Access, with error rates for those users dropping back to normal. However, the more complex application services customers continued to experience higher-than-normal error rates as the global routing system slowly returned to full health. The company spent the remainder of the day carefully monitoring the network and deploying fixes to fully restore stability, demonstrating that even after the primary issue is identified, the recovery process for an infrastructure of this size is a marathon, not a sprint.
B. Corporate and Market Response: Stock Movement and Public Statements
Cloudflare’s official communication was professional and timely, if brief. They focused on clear, incremental updates on their status page, stating they were “all hands on deck” to ensure traffic was served without errors. This transparency, while expected, is crucial during a major outage to manage customer and investor panic. However, the market reaction was predictable: Cloudflare Inc. (NET) stock experienced a drop, trading down approximately 4-5% in pre-market and early trading sessions as news of the widespread disruption hit. While this volatility is standard following major technical failures in the tech sector, it puts pressure on the company to provide a comprehensive, bulletproof post-mortem quickly. Investors understand that occasional glitches happen, but repeated, high-profile outages raise long-term concerns about system resilience and competitive advantage. The stock recovery will depend heavily on the depth and sincerity of their follow-up analysis.
C. Looking Forward: Post-Mortem and Future Prevention Strategies
The most important phase of this incident is yet to come: the post-mortem. A full report will detail the exact internal service that failed, why the “unusual traffic” spike occurred (was it a configuration error? A code bug? A dependency failure?), and critically, why their redundancy systems failed to isolate the issue. Based on lessons from previous incidents—like the dashboard/API bug in September 2025 where a bad dependency array caused API calls to repeatedly execute—Cloudflare will need to demonstrate concrete, architectural changes. Future prevention strategies must focus on hyper-segmentation of their internal services, ensuring that a failure in one internal API cannot cascade to the global routing plane. For the industry, the lesson is clear: relying on a single vendor’s claim of high-availability is no longer sufficient. Companies must prioritize implementing multi-CDN, multi-cloud, and multi-DNS architectures as a non-negotiable insurance policy against this kind of centralized chaos.
Conclusion: The Wake-Up Call for Internet Redundancy
The Cloudflare outage of November 18, 2025, serves as the loudest, most urgent wake-up call the internet has received in years. It wasn’t caused by a sophisticated external attack, but by an internal error—a bug, a traffic anomaly, or a misconfiguration—that proved the system was fundamentally brittle at its core. From the frustrations of X users to the business losses incurred by PayPal and the productivity halt at ChatGPT, the cost of this centralization is now painfully clear. The lesson isn’t that Cloudflare is incompetent; it’s that no single entity, no matter how talented, can manage a globally-critical layer of infrastructure without exposing the entire system to systemic risk. We need redundancy not just in theory, but in practice. Major platforms must diversify their CDN, DNS, and security layers. We must treat the digital backbone as the critical infrastructure it is, demanding multiple, independent providers to ensure resilience. The internet survived this chaos, but if we don’t learn from this November day, the next major outage will be worse. It’s time to build a more decentralized, robust, and resilient web for everyone.
FAQs
1. Why did my website have a 500 error during the outage?
This happened because your website likely uses Cloudflare to manage its traffic, deliver content, and provide security. The widespread 500 errors mean that the request died at Cloudflare’s edge server. When Cloudflare’s internal services failed, the edge server couldn’t successfully process the incoming request—it couldn’t confirm the site’s identity, route the traffic correctly, or deliver cached content—so it returned the generic “Internal Server Error” (500) message to your browser, never even reaching your actual website server.
2. How often do major Cloudflare outages happen?
While Cloudflare operates with extremely high reliability, significant global outages that impact the service-providing layer are not common, but they do happen periodically. We’ve seen a few key incidents in recent years, often months apart, including a major dashboard and API outage in September 2025 and previous core network disruptions. Each incident tends to be caused by a different internal technical failure (e.g., a routing bug, a configuration error, or an API dependency issue). The rarity of these events is what makes them so impactful when they occur.
3. What can companies do to mitigate the impact of a CDN outage?
The best mitigation strategy is diversification, often called a multi-CDN or multi-cloud strategy. Instead of relying solely on Cloudflare, large companies should employ two or more independent Content Delivery Networks (CDNs) and DNS providers. By using intelligent traffic routing tools, they can instantly shift a percentage of their traffic away from the failing vendor during an outage. This significantly reduces downtime, ensures that security and DNS resolution remain stable, and prevents their service from becoming a single point of failure in the broader internet ecosystem.
mb to kb is one of those simple concepts that somehow manages to confuse almost everyone at some point. Whether you’re trying to upload a file that “must be under 500 KB,” or you’re optimizing images for a Shopify store, or you’re just trying to understand how storage sizes work, converting MB to KB (and sometimes kb to mb) becomes part of everyday life. In this guide, I’m going to walk you through the real, practical, and actually useful ways to do MB to KB conversions — not just the basic formula, but the methods that people use every day without even noticing. We’ll also cover the long-tail variation most often searched: “how to convert MB to KB easily.” By the end, you’ll have at least seven ways you can use right now — plus a few tricks you probably never heard of, and yes, even a kb to mb converter recommendation.
Method 1 — Use the Standard MB to KB Conversion Formula
The Exact Formula Explained
When you’re converting from MB to KB, the simplest method is just using the actual formula. No tools, no special skills. The decimal conversion (used by most websites and tools): 1 MB = 1000 KB The binary conversion (used by some operating systems): 1 MB = 1024 KB Most online converters use the decimal version, unless they mention “MiB” and “KiB.” Stick with 1000 KB unless you need technical precision.
Quick Examples for Beginners
2 MB × 1000 = 2000 KB
5 MB × 1000 = 5000 KB
0.5 MB × 1000 = 500 KB Simple, clean, consistent.
Method 2 — Convert MB to KB Using Online Conversion Tools
Best Free Tools to Try
Online converters make things effortless. You just type the number, click convert, and you’re done. Here are real, reliable tools:
RapidTables MB to KB Converter — a clean and simple tool you can use here: RapidTables
CalculatorSoup Converter — great for both directions (mb to kb and kb to mb): CalculatorSoup
UnitConverters.net MB to KB Tool — fast and straightforward: UnitConverters
How to Avoid Inaccurate Converters
Avoid tools that display too many ads or convert using outdated binary-only assumptions. Choose websites with clear labels (MB vs MiB).
Method 3 — Convert MB to KB Through Your Operating System Settings
Windows File Properties Method
If you’re on Windows, you can check your file’s size instantly:
Right‑click the file.
Click Properties.
Under “Size,” Windows shows both MB and KB values. No math needed — Windows does the conversion for you.
macOS Finder Info Panel Method
On macOS:
Right‑click the file.
Choose Get Info.
Look for the size line — you’ll see KB and MB depending on filesize. macOS also rounds the numbers beautifully, which helps when comparing files.
Method 4 — The Overlooked Trick Most People Miss (MB to KB Using Command Line)
Converting via Windows CMD
This is the method most people skip because they think it’s complicated. It’s not. Open CMD and type:
for %i in (file.jpg) do @echo %~zi
Windows will display the file size in bytes. Then you can divide by 1000 to get KB or by 1,000,000 to get MB.
Converting via macOS Terminal
Use:
stat -f%z file.jpg
This gives you size in bytes. Same method — divide by 1000 or 1,000,000.
Why This Method Is More Accurate Than You Think
Command line reports exact bytes — no rounding. Perfect for developers, designers, and anyone comparing compression results.
Method 5 — Convert MB to KB Using Spreadsheet Software
Excel and Google Sheets Conversion Formulas
If you deal with a lot of numbers, spreadsheets are a lifesaver. Example formula:
=A1*1000
If cell A1 has 5 (MB), the result will be 5000 (KB).
Automating MB to KB Calculations
You can convert entire columns of MB values to KB with one formula, then drag to fill. This method is extremely useful for bulk image optimization or data organization.
Method 6 — Convert MB to KB Through Compression Tools
How Compression Affects File Size
A compression tool doesn’t exactly “convert” MB to KB, but it reduces MB files into smaller ones — often into KB. A few solid tools:
Conclusion — Mastering MB to KB Conversions With Ease
Key Takeaways from the 7 Methods
You now have seven different ways — from formulas to tools, spreadsheets to compression methods — to convert MB to KB quickly and accurately.
What to Do Next If You Want Faster File Management
Bookmark your favorite converter, or keep the simple rule in your head: MB to KB = MB × 1000. With these tricks, file size calculations will never slow you down again.
FAQs
1. How many KB are in 1 MB exactly?
Most commonly, 1 MB = 1000 KB. But in binary systems, 1 MiB = 1024 KiB.
2. What is the difference between MB, KB, and GB?
KB is smaller than MB, and GB is larger. 1000 KB = 1 MB, and 1000 MB = 1 GB.
3. Why do some tools show different file sizes?
Some tools use 1024 instead of 1000, leading to slight variations.
4. Is MB to KB conversion different for binary vs decimal systems?
Yes — decimal uses 1000, binary uses 1024.
5. What’s the easiest method for beginners?
Using an online converter like RapidTables — fast, clear, accurate.
Introduction: Why You Need to Convert WebM to MP4 Without Losing Quality
wemb to mp4 conversion is one of the most common things people search for when dealing with online videos. Maybe you downloaded a clip from a website, and it came in a .webm format that doesn’t play smoothly on your phone or editing software. Or perhaps you’re trying to upload it somewhere that only accepts MP4. Either way, you’re not alone — and the good news is, it’s super easy to fix.
Before we jump into the methods, let’s clear up something: WebM is a high-quality, open-source format often used on the web (especially by browsers like Chrome). MP4, on the other hand, is more universal and works pretty much everywhere — from iPhones to video editors to social platforms. So, converting WebM to MP4 means more compatibility, easier sharing, and better performance.
In this guide, I’ll show you 7 powerful and fast ways to convert WebM to MP4 without losing quality. Whether you prefer using an online tool, a desktop program, or even your phone, there’s an option here that’ll fit your needs perfectly.
1. Use an Online WebM to MP4 Converter for Instant Results
If you want a quick, no-installation-needed solution, online converters are the best choice. They’re fast, free, and work directly from your browser. Just upload your file, hit convert, and download your MP4 version.
Recommended Tools
CloudConvert – One of the most reliable tools out there. It supports batch conversion, allows you to tweak output settings (like resolution and codec), and keeps your video quality intact.
Convertio – Super user-friendly and works on both desktop and mobile browsers. It also supports cloud storage uploads like Google Drive or Dropbox.
FreeConvert – Simple, clean interface with optional advanced settings for compression and codecs.
Pros
No need to install anything.
Works on all devices.
Quick and easy to use.
Cons
File size limits (especially for free versions).
Requires an internet connection.
If you just need to convert a few clips occasionally, an online WebM to MP4 converter is the fastest way to go.
2. Convert WebM to MP4 Using VLC Media Player
VLC isn’t just a media player — it’s also a powerful converter. It’s completely free, open-source, and works on all major operating systems (Windows, macOS, Linux).
How to Convert WebM to MP4 with VLC
Open VLC and click on Media > Convert / Save.
Add your WebM file.
Click Convert / Save again.
Choose Video – H.264 + MP3 (MP4) from the Profile dropdown.
Select your output folder and hit Start.
It’ll take a few moments depending on your video size, and boom — your MP4 file is ready.
Why Use VLC?
It’s safe and free.
Maintains decent video quality.
Doesn’t need internet access.
If you already have VLC installed, it’s a no-brainer to use it for this.
3. Transform WebM to MP4 with FFmpeg (For Advanced Users)
If you’re comfortable with command-line tools, FFmpeg is a beast. It gives you complete control over how your video is processed.
Media Converter – Simple and effective for quick format swaps.
If you’re in a hurry, these apps are a lifesaver. You can convert, compress, and share your videos directly.
Conclusion: Choose the Best WebM to MP4 Converter for Your Needs
At the end of the day, the best WebM to MP4 converter depends on your situation. If you want speed and convenience, go for an online converter like CloudConvert or Convertio. If you prefer full control, HandBrake and FFmpeg are unbeatable. For everyday users, VLC gets the job done beautifully.
So next time you run into a WebM file that won’t play, you’ll know exactly what to do — and you won’t lose a bit of quality in the process.
1. Can I convert WebM to MP4 without losing quality?
Yes. If you use tools like FFmpeg or HandBrake with the right settings, you can convert WebM to MP4 without re-encoding, keeping the same video quality.
2. What’s the fastest free WebM to MP4 converter online?
CloudConvert and Convertio are among the fastest and most reliable online tools. They work right in your browser and maintain great quality.
3. Is WebM better than MP4 for YouTube uploads?
Both formats are accepted by YouTube, but MP4 is usually more efficient and easier to handle. WebM is great for web compression, but MP4 remains the standard for uploads.
4. Can I convert WebM to MP4 on my phone?
Absolutely. Use apps like The Video Converter (iPhone) or VidCompact (Android). They work smoothly and preserve quality.
5. Are there any file size limits for online converters?
Most free tools have limits (usually around 100MB–500MB per file). If you need to convert larger files, use desktop apps like VLC, FFmpeg, or HandBrake.