Cloudflare Outage Causes Global Internet Chaos: X, ChatGPT, and Spotify Among Affected Sites

Introduction: The Moment the Internet Stalled
The recent Cloudflare outage on November 18, 2025, wasn’t just another blip on the digital radar; it was a full-scale, worldwide internet heart attack. For several crucial hours, huge chunks of the web simply ceased to function, leaving millions of users staring blankly at frustrating “500 Internal Server Error” messages. When we talk about global network disruption, we often think of massive, deliberate attacks or natural disasters, but this time, it was an internal technical failure at a single, supremely critical company that triggered a global cascading failure. Cloudflare, for the uninitiated, is essentially the central nervous system for a massive portion of the modern internet. When a provider of this magnitude stumbles, the impact is instantaneous and pervasive. It wasn’t just niche sites that went dark—it was the platforms we rely on every minute, from social media giants like X (formerly Twitter) to cutting-edge AI services like ChatGPT. This event wasn’t merely inconvenient; it was a stark, sobering reminder of how critically interconnected—and perhaps overly centralized—our digital lives have become. This analysis will walk you through the technical guts of what went wrong, detail the massive collateral damage across the globe, and discuss the uncomfortable lessons we all need to absorb from this digital chaos. We’ll dive into why a single company holds this much sway and what this means for the future resilience of the web. This is the story of the day the internet collectively stalled.
Find More: Why Website Performance Impacts Revenue
Anatomy of the Cloudflare Outage
This section details the specific failures that took place on November 18, 2025, and how Cloudflare engineers scrambled to diagnose and resolve a problem that was simultaneously local to their systems and global in its effects.
A. The Technical Root Cause of the Widespread 500 Errors

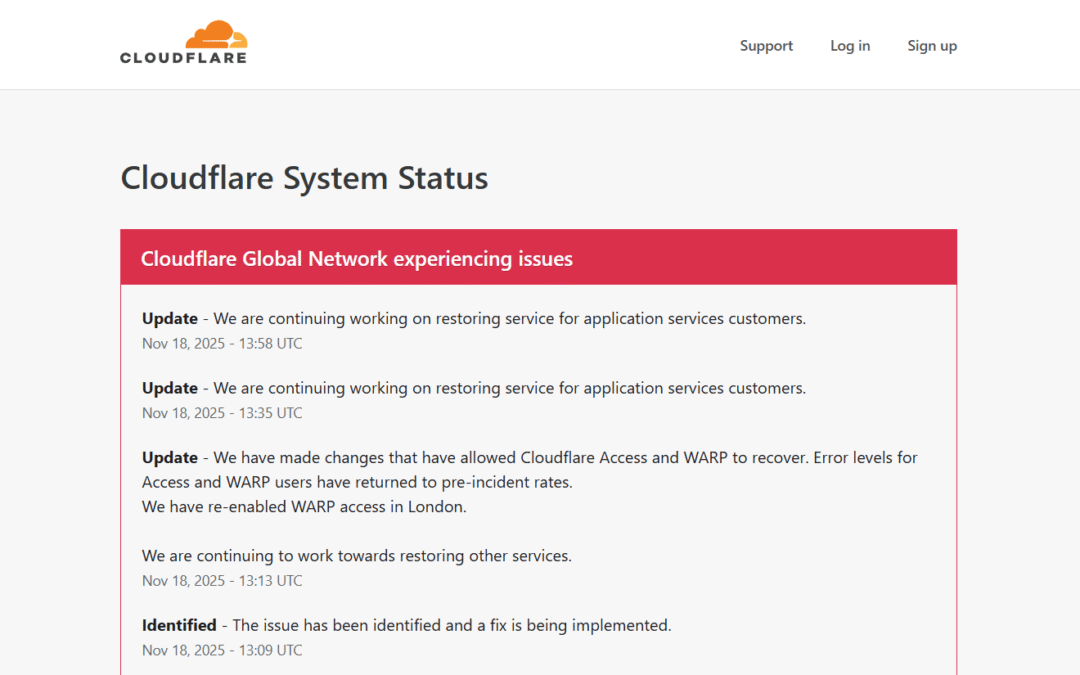
When the outage first hit around 11:20 UTC, the initial messages coming from the web—and from Cloudflare’s own status pages—were cryptic. What users saw were “Widespread 500 errors.” This is a generic HTTP status code that translates to, “Something went wrong on the server, but the server couldn’t be more specific.” In the context of the Cloudflare disruption, it meant the company’s edge infrastructure—the network of servers closest to the end-users—was unable to process requests for the millions of websites it proxies.
Sub-Section: Initial Detection and Timeline of the Incident The timeline released by Cloudflare indicated that the incident began around 11:20 UTC (6:20 AM ET) when they detected a sudden and “unusual traffic spike” targeting one of their internal services. This immediate influx of traffic wasn’t an external DDoS attack; it was a self-inflicted wound, a rapid internal service degradation that overloaded a critical piece of their routing infrastructure. Within 30 minutes, the issue had snowballed into a global catastrophe. Cloudflare’s engineering teams jumped into a full “all hands on deck” response, but even for a company built on speed and redundancy, stabilizing a core internal service under such immense pressure takes time.
Sub-Section: The Role of Scheduled Maintenance and Traffic Rerouting Interestingly, Cloudflare’s public status page showed that a scheduled maintenance window was in progress at their Santiago (SCL) datacenter between 12:00 and 15:00 UTC on the same day. While the company stated the global outage was due to an “internal service degradation,” the combination of scheduled maintenance that could reroute traffic and an unexpected internal traffic spike raises important questions about the overall system load and timing. Did the rerouting of traffic due to the Santiago maintenance contribute to the spike? Did the systems handle the failover process correctly? While the official root cause was the internal traffic event, the simultaneous maintenance shows that even routine, controlled changes can expose hidden fragilities in complex, highly interconnected systems, a factor that will undoubtedly be scrutinized in their post-mortem report.
Sub-Section: Widespread 500 Errors: Analyzing the Server Failure Response The 500 error messages were the universal sign of the failure. For those of us using the internet, it meant an immediate wall. For developers, it signaled a failure in the application’s backend or, in this case, the infrastructure layer in front of the backend. Since Cloudflare sits as a reverse proxy, security provider, and content delivery network (CDN) for its clients, it receives the request first. The internal failure meant that Cloudflare’s systems couldn’t effectively route the request to the client’s origin server, nor could they serve cached content or perform necessary security checks. Essentially, the request died at the Cloudflare edge, resulting in the dreaded 500 message across thousands of unrelated websites. This is the definition of a single point of failure in action, where the traffic manager itself became the traffic bottleneck.
B. Impact on Cloudflare’s Own Infrastructure
The problem wasn’t just that Cloudflare’s customers were experiencing issues; Cloudflare’s own systems were also crippled by the internal degradation, which significantly hampered their ability to respond.
Sub-Section: Cloudflare Dashboard and API Failures When a network operator needs to fix a global issue, they need their command center, or “control plane,” to be fully operational. During the November 18 outage, Cloudflare’s Dashboard and API suffered significant failures. For customers, this was extremely frustrating: they couldn’t log in to change settings, pause Cloudflare, or even view their analytics. More critically, for Cloudflare’s internal teams, a failing API meant that deploying fixes, rolling back changes, or rerouting traffic manually became exponentially harder. The situation echoes similar prior outages (like the one in September 2025, which was specifically a dashboard/API bug) and shows that the control plane remains a highly vulnerable, single point of failure within their own architecture. If you can’t access the controls, you can’t steer the ship out of the storm.
Sub-Section: Disruption of WARP and Access Services Beyond their core CDN and security offerings, Cloudflare’s newer services like WARP (their consumer VPN/connectivity service) and Access (their Zero Trust security platform) were also immediately impacted. Cloudflare specifically noted that they had to temporarily disable WARP access in London during their remediation efforts as they struggled to stabilize the network. The subsequent success in quickly restoring these services—often cited as the first to return to pre-incident error rates—provided an early sign that their overall efforts were working, but the initial failure highlights the interconnectedness of their service offerings. For thousands of remote workers and enterprises that rely on Access for secure network entry, this downtime meant an immediate and total halt to business operations.
Global Impact: Which Major Platforms Were Affected?
The sheer scale of the disruption shows just how central Cloudflare has become to the modern digital ecosystem. If you had an internet presence of any significant scale, odds are you use Cloudflare for speed, security, or DNS, and you were affected.
A. Social Media and Communication Services
The most immediate and visible chaos erupted across platforms that thrive on real-time communication, leading to mass user frustration and communication breakdowns globally.
Sub-Section: X (Formerly Twitter) Outage: User Frustration and Communication Breakdown The social media platform X, a constant source of news and real-time interaction, was one of the highest-profile casualties. Users globally reported issues with loading their timelines, inability to post new content, and frequent login errors. For many, X is the primary source of immediate global news, and its downtime created a momentary communication vacuum. The irony was thick: people couldn’t use X to complain about the outage, forcing them to turn to alternatives (many of which were also down) or simply refreshing the page in desperation. The intermittent nature of the failure—sites like X came back online temporarily before suffering further problems—only amplified the frustration, as brief moments of hope were quickly dashed by renewed 500 errors.
Sub-Section: The Downtime for ChatGPT and OpenAI Services The disruption didn’t spare the artificial intelligence frontier either. OpenAI’s groundbreaking ChatGPT service, along with other related OpenAI APIs and tools, faced significant downtime. As AI rapidly integrates into daily business and education, the inability to access ChatGPT became a major productivity hit. Students couldn’t finish homework, developers lost access to coding assistance, and businesses relying on AI-powered customer service saw critical tools fail. This specific failure underscores a new vulnerability for businesses: not only are they reliant on their own infrastructure and CDN, but they are also reliant on the uptime of third-party AI services, many of which also use Cloudflare. The outage proved that the digital supply chain has extended far beyond basic hosting and into the realm of intelligent services.
B. Entertainment and Financial Platforms
The breadth of the failure extended into the recreational and financial spheres, demonstrating that almost no digital sector is immune.
Sub-Section: Streaming and Media: Spotify, Letterboxd, and More For millions around the world seeking distraction or entertainment, the outage was a mood killer. Streaming giant Spotify, the primary source of music for many, experienced significant access issues and slow loading times. Film review aficionados on Letterboxd found themselves unable to log their latest movie ratings. The fact that platforms offering such diverse services—from high-bandwidth audio streaming to niche social movie logging—were all affected simultaneously is the defining feature of a Cloudflare-centric disruption. The common denominator was simply the invisible Cloudflare backbone.
Sub-Section: Business and Financial Services: PayPal, Sage, and bet365 Perhaps the most worrying impact was on financial and business services. While critical banking infrastructure is typically insulated, payment processing and business software platforms felt the heat. Reports indicated that PayPal, a colossal player in e-commerce, experienced issues, halting transactions for thousands of online stores. Similarly, business software providers like Sage and popular betting services like bet365 were also disrupted. For these companies, downtime doesn’t just mean a few frustrated users; it means lost revenue, halted payroll runs, and severe financial consequences. The ability of a CDN outage to directly impact the flow of global commerce serves as a major warning shot to the entire financial technology sector.
The Significance of Cloudflare in the Modern Internet
To truly grasp the magnitude of this disruption, we need to understand exactly what Cloudflare does and why so many businesses rely on it. It’s not just a hosting company; it’s an invisible layer of internet defense and speed.
A. What is Cloudflare? (CDN, DNS, and Security)
Cloudflare operates as a massive network of servers distributed across 300 cities in over 120 countries, sitting between a website’s origin server and the end-user. It provides three primary, critical services:
- Content Delivery Network (CDN): This is perhaps its most famous function. Cloudflare caches static content (like images, CSS files, and JavaScript) on its edge servers close to the user. This means when you visit a website, the content doesn’t have to travel across continents from the origin server; it’s served instantly from a nearby Cloudflare server. This dramatically increases website loading speeds.
- Domain Name System (DNS): Cloudflare runs one of the world’s most popular DNS services (1.1.1.1). DNS is the phonebook of the internet, translating human-readable website names (like
google.com) into computer-readable IP addresses. Cloudflare’s DNS is fast and resilient, making it a critical foundation for web routing. - Security and DDoS Mitigation: Cloudflare acts as a web application firewall (WAF) and DDoS shield. It filters out malicious traffic, bot attacks, and denial-of-service attempts before they ever reach a client’s origin server. It’s the digital bouncer and bodyguard for millions of websites, protecting them from being overwhelmed by bad actors.
Because companies often bundle these services, relying on Cloudflare provides a single, high-performance solution for speed, routing, and defense. This efficiency is Cloudflare’s massive selling point, but it’s also the source of the internet’s current fragility.
B. Single Point of Failure: The Risk of Centralized Infrastructure
The Cloudflare outage, like those that occasionally hit Amazon Web Services (AWS) or Microsoft Azure, highlights the profound risk of centralizing the internet’s backbone. When a large percentage of global web traffic, security, and DNS resolution flows through a handful of mega-providers, a failure in any one of them creates an unavoidable single point of failure.
Imagine all major roads in a country routing through a single, central junction. When that junction shuts down, traffic across every spoke of the road network grinds to a halt—even if the individual destinations were fine. Cloudflare is that junction. For companies, relying on Cloudflare is efficient and cost-effective, but for the internet as a whole, it creates a massive systemic risk. The November 18 incident didn’t require an external threat; an internal traffic surge was enough to prove that too many critical services have put all their routing eggs in one high-availability basket. This incident should accelerate the internal discussion within every major technology company about the necessity of multi-CDN and multi-DNS strategies to ensure true redundancy and prevent future cascading failures of this scale.
Resolution and Remediation

The return to normalcy was a grueling, hour-by-hour fight fought by Cloudflare’s engineers, followed by the inevitable corporate reckoning.
A. Remediation Efforts and Timeline to Recovery
Cloudflare’s team rapidly implemented a fix after identifying the root cause—the unusual internal traffic spike—around 1:09 PM UTC. The process of recovery, however, was not instantaneous. Cloudflare employs a global network with complex state, and stabilizing it requires careful, phased steps to avoid a “thundering herd” effect (where too many services try to reconnect at once, causing a second wave of overload). The first signs of recovery were seen in the return of internal services like WARP and Access, with error rates for those users dropping back to normal. However, the more complex application services customers continued to experience higher-than-normal error rates as the global routing system slowly returned to full health. The company spent the remainder of the day carefully monitoring the network and deploying fixes to fully restore stability, demonstrating that even after the primary issue is identified, the recovery process for an infrastructure of this size is a marathon, not a sprint.
B. Corporate and Market Response: Stock Movement and Public Statements
Cloudflare’s official communication was professional and timely, if brief. They focused on clear, incremental updates on their status page, stating they were “all hands on deck” to ensure traffic was served without errors. This transparency, while expected, is crucial during a major outage to manage customer and investor panic. However, the market reaction was predictable: Cloudflare Inc. (NET) stock experienced a drop, trading down approximately 4-5% in pre-market and early trading sessions as news of the widespread disruption hit. While this volatility is standard following major technical failures in the tech sector, it puts pressure on the company to provide a comprehensive, bulletproof post-mortem quickly. Investors understand that occasional glitches happen, but repeated, high-profile outages raise long-term concerns about system resilience and competitive advantage. The stock recovery will depend heavily on the depth and sincerity of their follow-up analysis.
C. Looking Forward: Post-Mortem and Future Prevention Strategies
The most important phase of this incident is yet to come: the post-mortem. A full report will detail the exact internal service that failed, why the “unusual traffic” spike occurred (was it a configuration error? A code bug? A dependency failure?), and critically, why their redundancy systems failed to isolate the issue. Based on lessons from previous incidents—like the dashboard/API bug in September 2025 where a bad dependency array caused API calls to repeatedly execute—Cloudflare will need to demonstrate concrete, architectural changes. Future prevention strategies must focus on hyper-segmentation of their internal services, ensuring that a failure in one internal API cannot cascade to the global routing plane. For the industry, the lesson is clear: relying on a single vendor’s claim of high-availability is no longer sufficient. Companies must prioritize implementing multi-CDN, multi-cloud, and multi-DNS architectures as a non-negotiable insurance policy against this kind of centralized chaos.
Find More: Boost Your Sales With SEO Services
Conclusion: The Wake-Up Call for Internet Redundancy
The Cloudflare outage of November 18, 2025, serves as the loudest, most urgent wake-up call the internet has received in years. It wasn’t caused by a sophisticated external attack, but by an internal error—a bug, a traffic anomaly, or a misconfiguration—that proved the system was fundamentally brittle at its core. From the frustrations of X users to the business losses incurred by PayPal and the productivity halt at ChatGPT, the cost of this centralization is now painfully clear. The lesson isn’t that Cloudflare is incompetent; it’s that no single entity, no matter how talented, can manage a globally-critical layer of infrastructure without exposing the entire system to systemic risk. We need redundancy not just in theory, but in practice. Major platforms must diversify their CDN, DNS, and security layers. We must treat the digital backbone as the critical infrastructure it is, demanding multiple, independent providers to ensure resilience. The internet survived this chaos, but if we don’t learn from this November day, the next major outage will be worse. It’s time to build a more decentralized, robust, and resilient web for everyone.
FAQs
1. Why did my website have a 500 error during the outage?
This happened because your website likely uses Cloudflare to manage its traffic, deliver content, and provide security. The widespread 500 errors mean that the request died at Cloudflare’s edge server. When Cloudflare’s internal services failed, the edge server couldn’t successfully process the incoming request—it couldn’t confirm the site’s identity, route the traffic correctly, or deliver cached content—so it returned the generic “Internal Server Error” (500) message to your browser, never even reaching your actual website server.
2. How often do major Cloudflare outages happen?
While Cloudflare operates with extremely high reliability, significant global outages that impact the service-providing layer are not common, but they do happen periodically. We’ve seen a few key incidents in recent years, often months apart, including a major dashboard and API outage in September 2025 and previous core network disruptions. Each incident tends to be caused by a different internal technical failure (e.g., a routing bug, a configuration error, or an API dependency issue). The rarity of these events is what makes them so impactful when they occur.
3. What can companies do to mitigate the impact of a CDN outage?
The best mitigation strategy is diversification, often called a multi-CDN or multi-cloud strategy. Instead of relying solely on Cloudflare, large companies should employ two or more independent Content Delivery Networks (CDNs) and DNS providers. By using intelligent traffic routing tools, they can instantly shift a percentage of their traffic away from the failing vendor during an outage. This significantly reduces downtime, ensures that security and DNS resolution remain stable, and prevents their service from becoming a single point of failure in the broader internet ecosystem.