Introduction
After choosing Shopify as the powerful eCommerce platform to help you kickoff online business, definitely, you should start uploading your selling items to launch the store as soon as possible. Desiring to contribute to your effective store management, Atamgo will walk you through how to add products to Shopify within 7 easy steps.
Let’s get cracking!

What is Shopify?
Shopify is one of the most popular hosted eCommerce platforms, allowing users to easily set up their online store and start the business. Because it is cloud-based and hosted, Shopify handles the complex source code and users do not have to obtain any technical skills to launch the business.
Get more insight with our detailed Shopify review – Is Shopify worth it in 2022?
Even during the 14-day free trial, store owners can still upload products to Shopify to test the platform without having to submit any payment card information.
Don’t wait any further, let’s get cracking on how to add products to Shopify!
7 Steps Of How To Add Products To Shopify:
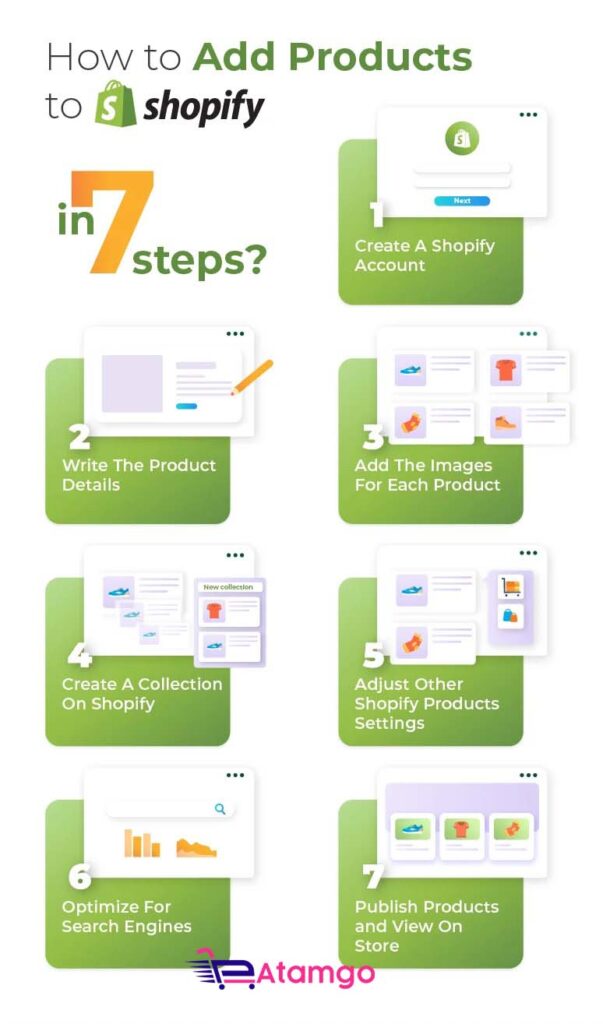
Step 1: Login To Your Shopify Account
Step 1 is the most effortless step as it takes you less than 1 minute to enter the account information and your store domain.
The most common problem users tend to meet is they forget the passwords. Don’t worry because you can receive the verification code via the registered email address. To avoid this time-consuming process, try to note down your passwords or let the browsing history remember it for you.
After filling in the account information, you will reach the dashboard which is only visible for admins. Here present the most important functions of Shopify:

Step 2: Write The Product Details
In the next step, you can begin adding information to your product page. Details about your product will include several items:
- Title: should be short and memorable in order to help both you and your customers to call the product name. The product title does not have to cover all the information about the product, because the details will be written in the Description part. Plus, be consistent in the way you name your products. If you contain the colour in one product title, you should do the same to others.
- Description: must cover the emotional and rational reasons why customers should add the products to their cart. Keep in mind who is your target audience and list down how this product can help them. There’s a rich text editor in this section so use it to emphasize the important information and impress your customers.
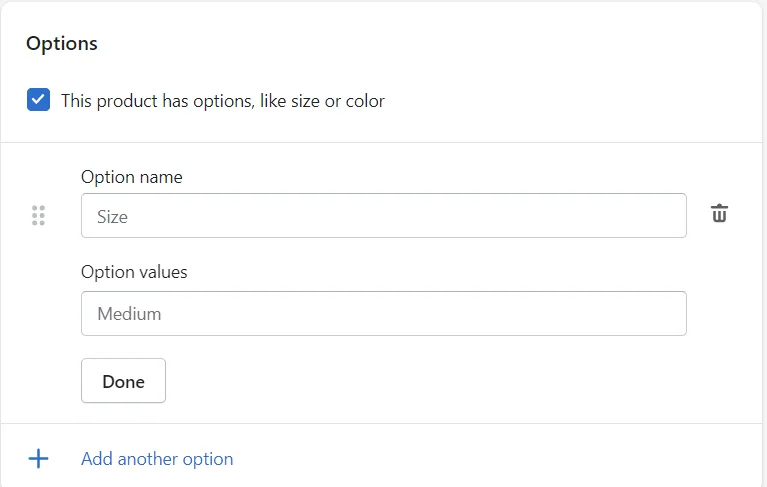
Options: Tick the box of “This product has options, like size or colour” and then Shopify will show you the below blanks:

You can choose Color, Size, Material, and Size in the Option Name, and add values for each selected option. Many store owners ignore this section, however, a variety of options indicates the product diversity in your store, as well as helps the owners to easily classify products in the inventory.
- Vendor: In this section, write your brand name if you sell your self-made products. Or else, write the name of the manufacturer or suppliers.
Step 3: Add The Images For Each Product
Product Image will directly affect customers’ buying decisions. A successful product image enables customers to imagine what’s the product like without touching it.
You should add multiple images of different angles for each product so that customers can have a full-fledged look into the product. Additionally, provide customers with the products in available colours. The photos should be taken in accordance with the concepts of your brand.
If you do not use your own photos, get permission before downloading and placing any images.
Similar to the product title, the Shopify product images should be named consistently. Try to use SEO keywords so that the picture also helps customers easily navigate your store via search engines.
Step 4: Create A Collection On Shopify
Adding Collection to your Shopify store has lots of advantages. It not only helps you to structure your website store but also upgrades the customer experience. Because when customers reach your store site, they will quickly find things they want to buy.
Remember that one product can belong to several collections. Collections will vary depending on what you’re selling, but they’re often along the lines of: “Men T-shirts”, “truck seats”, “vintage accessories”, and so on. The collection name should be based on the search behaviours of your customers.
You may be wondering how to add products to a collection on Shopify, here comes the guide!
There are two types of collections: manual collection and automated collection. Store owners prefer the automated type, as Shopify will automatically add all the products into their collections based on the conditions:
Some Shopify templates will allow you to add the collection’s image. If you don’t select a collection picture, the image of your collection’s first product will be used.
Step 5: Adjust Other Shopify Products Settings
There are several additional settings that you should pay attention to:
- Pricing: Remember to set reasonable prices based on your brand positioning. When setting prices, you can also think about Discounts. Shopify allows users to set when customers can apply the discount code. For example, when customers buy a specific number of products, the discount code will automatically be applied.
- Shipping: It’s critical to pre-set the most efficient shipping methods for your consumers. This must be set up before you receive the first order so that customers can select their preferred delivery method at checkout. Shopify offers three selections: shipping, local delivery, and local pickup. Depending on your business type, you can limit the number of available shipping options.
- Product Reviews: You may add a customer review feature to your products with the Product Reviews app. This triggers customers to interact with your company and generates more sales.
Step 6: Optimize For Search Engines
SEO will determine the number of customers navigating to your store site. There are simple but important tips you should consider to follow:
- Use Ahrefs or other SEO tools to know what your target customers are searching for. Make a list of high-volume keywords.
- Insert the selected keywords into product names, internal links, and image names.
- In the Shopify marketplace, find suitable Shopify SEO plugins to have the most SEO performance.
Step 7: Publish Products and View On Store
You have reached the final step! Remember to have a quick review of all the information you have added to the product before clicking the “Save Product” button.
The “View on your website” option helps you to see the preview of your product so that you can adjust if there are any issues. You can edit the products by returning to the first step.
How To Import Shopify Products?
If you have already placed your product information in another eCommerce platform, you may not choose to manually add products to Shopify. Instead, you may find a more convenient way to import products to Shopify.
There are two main importing methods. Initially, you convert the store data into CSV files. Then, edit them following the right format of Shopify. After that, upload those edited to the Shopify database. Though this is the most economical method, it takes you a huge amount of time to complete. Imagine if you have hundreds or thousands of products, you must rethink and look for other methods.
However, the 3-step process guide on how to import Shopify products manually has been provided so don’t forget to take a look.

The second method is in favor of many store owners. In order not to waste time, they ask for Atamgo’s help. Let’s check out Atamgo the best Shopify agency London. Atamgo has experienced thousands of Shopify store management. Thus, if you want to facilitate the product importing process to Shopify, immediately leave it for the expert!
Not only products but also customers and orders can be automatically migrated to Shopify with only a few clicks. Noticeably. Shopify will immediately produce new URLs for your entities when you transfer from another platform to Shopify. As a consequence, your SEO rankings will suffer. That’s why 301 redirects should be used to secure your SEO rankings. Plus, if customers use the old URL, 301 redirects will automatically direct them to the new site.
How to Duplicate a Product?
Duplicating products will save a huge amount of your time when listing products in Shopify. Imagine you have manually added several products, and the next ones have similar features. “Duplicating product” is the most helpful function to use.
This step has nothing complicated. Only by clicking “Duplicate”, Shopify will generate the new product with the available settings. However, remember to adjust several necessary elements (especially product names and product images). Thus, you can still guarantee product diversity for your store.
Add New Products with Shopify POS
The Shopify Point Of Sales (POS) helps you to integrate the devices and allows users to manage the store even on your laptop, iPad or iPhone. Thus, you don’t have to be present in the store and can still check the order status.

Shopify POS is a must especially if you have more than one point of sales. Because it is the most convenient and systematic method to track the operations across retail locations.
Setting Shopify POS up is a simple task but requires your long-span attention:
- Firstly, Shopify advises you to check your nation’s laws and verify whether Shopify POS is legal in your place or not.
- Secondly, complete some basic settings such as the addresses and contacts of your retail locations.
- Thirdly, add staffs’ accounts to the system so that they can do the daily updates.
List Products to Sales Channels
Listing Products to multiple sales channels will widen the reach of your products.
The Sales Channels button is at the left corner of your admin site. Click the “+” icon next to it and Shopify will recommend to you several popular sales channels below:

How to Delete Products on Shopify
Removing Products from your Shopify store doesn’t take a lot of time. Commonly, store owners delete products because they have decided not to sell the products anymore.
Remember that after clicking the “Delete” button, you can not recover the information about this product. Thus, if you are unsure about removing the product forever, you only need to hide the products. Hidden products’ information is not displayed in the front-end, but still stored in the back-end.
FAQs
1. What are the best Shopify alternatives?
Magento, BigCommerce, or PrestaShop, can be great Shopify alternatives.
2. Is Shopify good for beginners?
As you can see from our Shopify review, Shopify is a dynamic all-in-one solution to host and manage an online store that doesn’t take much muscle and technical expertise. Thus, it’s ideal for newbies and amateur users.
3. Does Shopify take advantage of sales?
The pricing fee of Shopify only includes the fees of monthly subscriptions and additional plugins.
4. How many stores can I have?
Shopify only allows users to have one store site per account. Thus, you have to create another account and operate the new store separately.
5. How to publish Shopify store?
First, you have to purchase a premium plan, then buy a new domain or link the existing domain to your Shopify store. After that, disable the front-end password by unchecking “Enable password”. Then “Save” to publish Shopify store.
Summary
Congratulations! You’ve just walked through a detailed guide on how to add products to Shopify. This is a simple stage, however, it is quite time-consuming. Thus, if you have the intention to add products not just on Shopify, but on other eCommerce platforms (like Amazon or Etsy), try to contact our Shopify marketing expert!
You may join our eCommerce community to get more useful tips for your online business. Also, if you’re thinking about switching to Shopify, check out Shopify marketing strategy for the most effective option!