...
UK: +44 2038074555 info@atamgo.com
The Essential Guide to Store Security on Shopify

The Essential Guide to Store Security on Shopify

shopify security

Worry about your e-commerce store’s security?

Wonder whether Shopify is safe

Wonder how to build strong trust in your customers

We will help you address your concern about store security as well as Shopify security in this post.

Though your products are out-of-this-world, there are some factors making online shoppers hesitate to make a purchase such as a store’s prestige, personal data,…That’s why you should not only focus on improving the quality of products but also increase the credibility of your store.

Let’s scroll down for crucial points for the sake of your store’s Shopify security for any seller or Shopify agency.

Why does Shopify security matter?

Before figuring out the answer to this question, it is important to know Shopify’s Pros and Cons deeply and completely.

It is common that Shopify security has become a common concern when one decides to set up online stores on Shopify. Without a doubt, security is highly crucial in the eCommerce industry as eCommerce involves dealing with customers’ confidential information such as their payment details and addresses. 

Is Shopify safe?

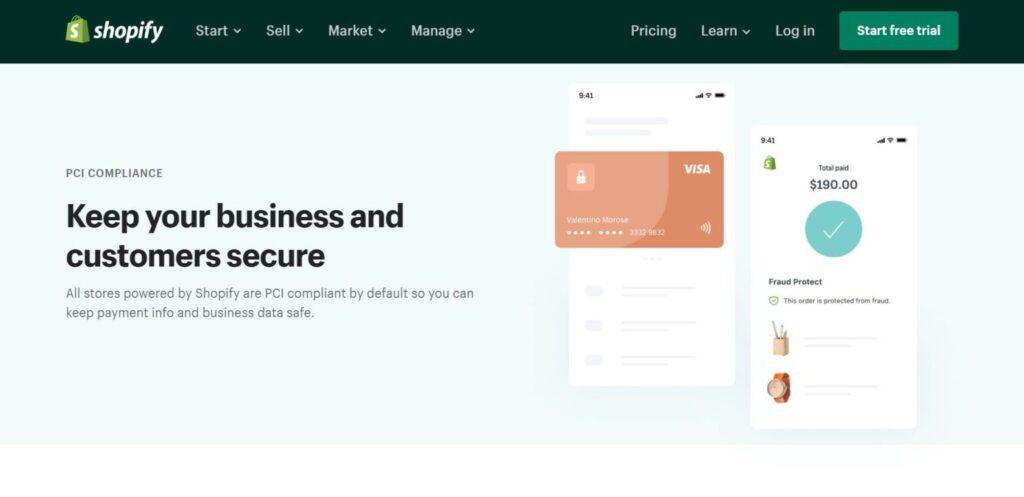
Shopify is an e-commerce platform designed for small and medium business owners. Not many users have the financial means to devote the majority of their budget to website support. Therefore, the platform developers have established automatic systems that monitor data security and money transfers. That helps to ensure that Shopify’s secure payments are effective and stable.

What is PCI?

Basically, PCI compliance is the data security standard for the payment card industry. It is developed by the Payment Card Industry Security Standards Board and established by international payment systems such as Visa, MasterCard, American Express, JCB, and Discover. Without this standard which requires an integrated strategy to ensure credit card data information security, online shoppers always have to worry about security in modern E-Commerce. 

Is Shopify compliant with PCI?

shopify security

Shopify is certified according to the Level 1 PCI DSS standard including 6 categories:

  1. Maintain a secure network
  2. Maintain a vulnerability management program
  3. Regularly monitor and test networks
  4. Protect cardholder data
  5. Implement strong access control measures
  6. Maintain an information security policy 

It implies that the stores are equipped with data encryption tools, protection of Shopify payment transfers, virus prevention on the servers, risk analysis tools as well as constant security monitoring. Both merchants and the seller are already protected at the stage of transactions and card data entry.

eCommerce platforms like Shopify need robust security measures to instill customer trust and safeguard sensitive information. On top of implementing strong access control measures, an effective incident response plan is crucial in swiftly addressing any data breaches. For example, having a comprehensive understanding of incident response planning best practices can significantly augment your store’s preparedness for unforeseen security challenges.

The Essential Guide to Store Security on Shopify

Secure as it seems, if you don’t know how to utilize Shopify security features, you could always have butterflies in your stomach because you can’t deal with financial risk, identity theft or customers’ trust loss completely.

Therefore, we suggest you some guidelines for your store’s Shopify security. These will undoubtedly assist merchants and other organizations in gradually protecting themselves from the highest risk factors and escalating threats on Shopify. 

Let’s check it out right now!

Set up security badge

  • What is a trust badge? Why is it crucial to your store on Shopify?

Exactly as it sounds like, a trust badge is a badge that you place on your web page to increase trust. It can be in the form of a lock symbol next to the URL or by checking whether the page starts with “HTTPS”. 

shopify security

You can find them during the checkout process, but an increasing number of eCommerce store owners are placing them on their product pages or homepage. These badges confirm to customers that your business has a certain service and is safe to process their money. 

According to a survey carried out by TrustedSite62% of consumers have begun to purchase an item online only to abandon the purchase because of security concerns. From that, we understand the significance of a security badge. It alleviates customers’ concerns about security in terms of personal data and the company’s reputation.

  • 5 common types of trust badge 

Trusted-Badges

Actually, there are a variety of trust badges, however, we found 5 key trust badges that really help to improve your conversion rate on your site. Each has its own purpose and use in terms of Shopify security, but all of them can help you improve your store’s reliability. You can select appropriate categories based on the effect you wish to achieve on your store. Now let’s dive into each trust badge.

Type #1: Safe Checkout Badge

It is a signal that your shop can be trusted by numerous regulations. On Shopify, your online site will automatically integrate with SSL (Secure Socket Layer) certificates. This is convenient since you don’t have to take your time signing up or purchasing, and your customers know their personal information is safe. Many retailers appreciate Shopify security for this reason. 

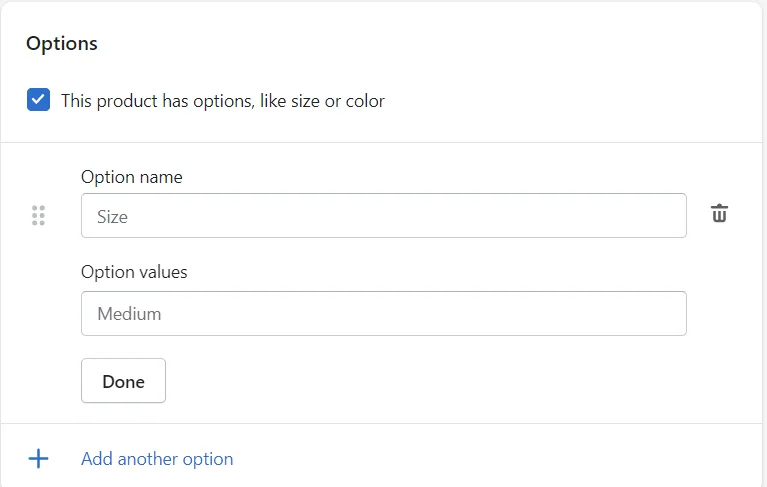
The checkout process is secure, information is encrypted, and the internet connection is safe. There is no reason for customers to leave the purchase at the last step. It’s very easy to get the safe checkout badge. On your Shopify checkout page, click the option “upload your logo”.

Trusted-Badges

Type #2: Accepted Payment Badges

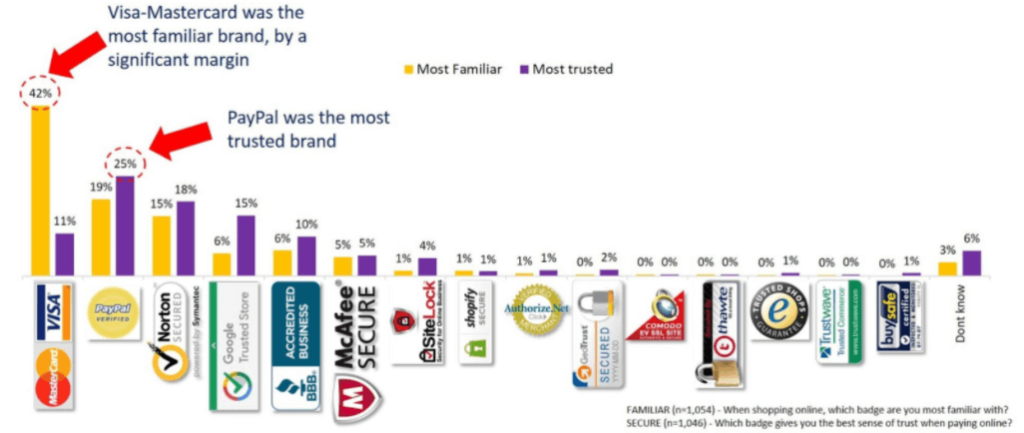
Many people purchase from brands they recognize. Without putting too much effort, and accepted payment badge enhances your site’s credibility and confidence. Some trust badges include having the Visa, MasterCard, or PayPal badges listed as acceptable payment on your site. 

The best thing is that these payment processor badges are both free and simple to get. You can sign up for a Visa merchant program and get a Visa Verified emblem at your online store. When you sign up for many programs, you can get a stunning line of payment processor badges to put anywhere on your website. This gives rise to increasing your store’s Shopify security.

Trusted-Badges

Type #3: Third-Party Endorsements

You can also help instil trust and confidence with your customers by using third-party endorsements. This can show your brand has credibility. You have to go through an application process and have your website reviewed before you are granted this type of badge. 

For example, if you want to have a Better Business Bureau badge, you need to adhere to its accreditation standards. Visit BBB.org then choose to Get Accredited to read and understand more about the process.

shopify security

The Google Trusted Store badge is also a widely recognized and trusted badge you can add to raise Shopify security. To be eligible for the Google Trust Seal, you must first apply and meet the requirements that Google sets for this program. That includes Google Customer Reviews. 

After your business has been verified by Google, your customers will start receiving surveys after completing purchases. After Google determines that your reviews are sufficient, you will be awarded a badge.

shopify security

Type #4: Money-Back Guaranteed Badges

They are commonly used as a marketing technique, as they provide customers with a sense of safety when purchasing a new product. This is a free badge option that can help your site gain trust. 

You may either make your own badge or get a printable version to use on your site. Or you can design this yourself or get it for free from many sites online. If you want the badge to match your site’s design, you can hire a freelancer to do it for you.

shopify security

Type #5: Free Shipping and Returns Badges

Having such a good badge along with a money-back guarantee badge highlights your store policy and your level of customer service. It also gives customers a sense of safety and reduces some risks when buying online. It is completely free, you can create it on your own or download it online.

shopify security

Apply two-step authentication

Two-step authentication is a more secure login process for Shopify Security. When one tries to log in to your Shopify admin using your account, it offers an extra layer of protection. With the second step, even if someone else knows your password, they are unable to log in. 

To install this function, follow these two steps:

Step 1Enter your account credentials, which include your email address and your password.

Step 2Verify your attempt to log in by using a mobile device or a security key.

Secure two-step authentication relies on combining two factors, which can be something you know (such as your email address and password combination), something you have (such as a one-time use code that is provided by an authentication app or through SMS text, or a security key).

shopify security

Create admin security 

Due to the heavy workload, you need to share admin permissions with your staff so that they can give you specialized support such as replying to customers, completing orders, etc. Nevertheless, it may pose a significant danger if every staff member has access to important information. 

To reduce this risk, Shopify provides a secure back-end offering a staff permission system. This function allows you to set levels of access to your staff. This video below will assist you in managing your staff account:

Turn on payout notifications

If you don’t already get them, you can set up alerts for whenever a payout is sent to your bank with a link to the order. That way you can review the order and customer details to quickly spot any issues.

When a payment is delivered to your bank account, Shopify sends you an email by default. The email contains the amount paid and a link to the payout in your store, so you can check the purchase and customer’s information. 

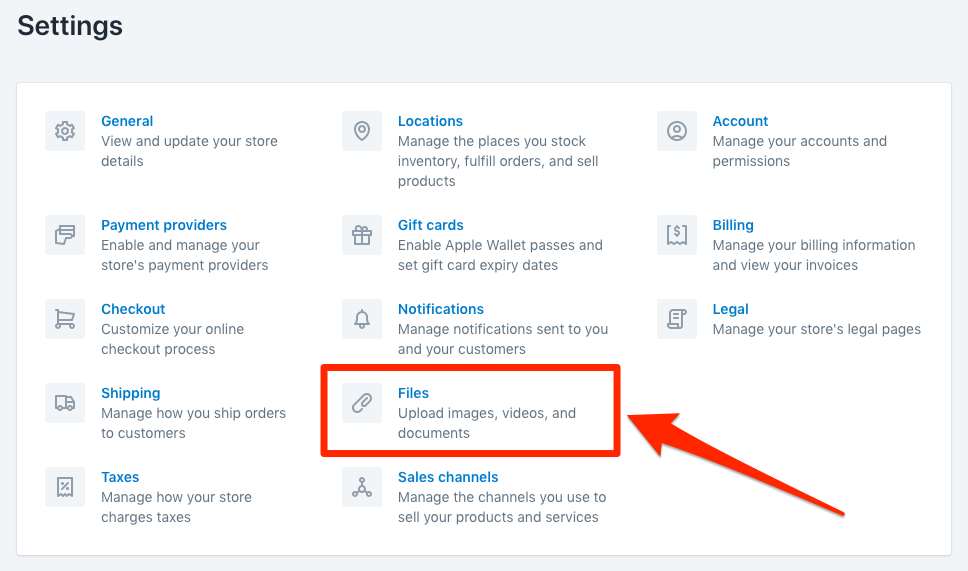
You can turn these emails on or off in your Shopify Payments settings, then applying 4 steps below:

Step 1: From your Shopify admin, go to Settings > Payments.

Step 2: In the Shopify Payments section, click Manage.

Step 3: Under the Payout schedule in the Payout Details section, check or uncheck Enable notifications.

Step 4: Click Save.

Implement fraud protection

There is nothing more devastating than the fraud that undermines customer trust, damages your reputation and on top of that, affects your business’s revenue. Therefore, implementing effective fraud protection is of great help to your E-commerce business. Luckily, Shopify fraud protection is great and reliable. It will flag potentially fraudulent orders for manual scrutiny before processing. 

You may choose whether your orders are completed manually or automatically, giving you total control over the process. Orders that have been marked as suspicious can be double-checked before they are sent out.

Here are 4 steps you need to implement fraud protection in your Shopify store:

Step 1: From your Shopify admin, go to Settings > Payments.

Step 2: In the Shopify Payments section, click Manage.

Step 3: In the Fraud prevention section, check the options that you want to use to automatically decline charges.

Step 4: Click Save.

shopify security

Increase Shopify security to your store by setting Fraud protection

If Shopify can’t meet your business requirement, there are some useful apps that will help with fraud prevention such as SignifydNoFraud, and Synctrack. Authenticating your domain name with DMARC will also prevent impersonation attacks.

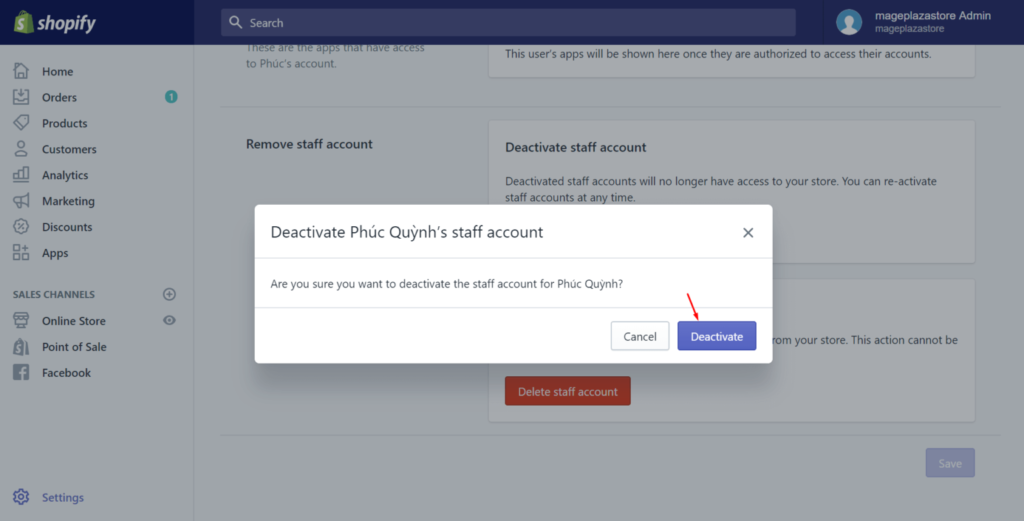
Audit staff member permissions

You can give permissions to your staff so that you can manage what your store’s staff can view, and what they can do in your Shopify admin or Shopify POS. However, if one of your staff no longer works here, you can deactivate the staff account so that they can’t log into your store any longer. For security purposes, you should deactivate any unused staff logins.

In order to do so, follow these steps:

Step 1: From your Shopify admin, click Settings and then click Users and permissions.

Step 2: Click the staff’s name.

Step 3: Click Deactivate staff or Suspend access.

Step 4: Then click Deactivate or Suspend.

shopify security

Back up your store

No matter how attentive you are, no one is able to ensure 100 per cent security. So having regular, ideally automatic, backups of your shop is the best defence against a catastrophic incident. With a copy of your store, you can restore it to its original version. 

Actually, Shopify supports users to back up their store information by exporting CVS (Comma Separated Value) files. 

Here are some steps you can take to use CVS files. 

Step 1: Log into your Shopify store admin area.

Step 2: Choose the store information you want to back up.

Step 3: Click on “Export”.

Step 4: Tick the boxes to export the current page / all products and if you want a plain CSV file, then click on “Export Products”.

However, this process requires some manual effort. Or else, you can download Rewind Backups that helps to automatically back up your store every day and undo unintentional changes.

shopify security

Wrapping up!

E-commerce is vulnerable to a wide range of threats; however, Shopify is a great option for your business. The reason is that this platform meets all the requirements of security. 

As long as you follow Shopify Security guidelines strictly, it gives you peace of mind about your store’s security on Shopify. As a matter of fact, Shopify security prevents your store from data, information leakage, and financial risks while gaining customers’ trust. 

We will keep updating new guidelines about Shopify security if we come across something new and useful.

Tags:

               Author: Wail Amrani

Wail is a Shopify Expert & eCommerce Growth Consultant. Former digital marketing manager at Shopify I’m helping brands & retailers build 8-figure eCommerce. I’ve been leading digital growth for both online and retail brands for over 7 years.

Best Shopify Blog Strategy To Reach 7 Figures In 2025

Best Shopify Blog Strategy To Reach 7 Figures In 2025

Have you ever intended to build your own online business on Shopify but ended up having no money to promote it? Or are you having some problems delivering long content on your social media platforms? Then we’ll give you one solution to your problem: Creating a Shopify Blog to reach 7 figures. 

Blog is an old term, but probably never goes out of style. In fact, 77% of internet users read blogs. That’s shocking, right? In business, blogging is powerful, but sadly, an underutilized tool to attract, persuade and retain customers. 

In this post, we’ll give you a thorough guide to building a Shopify blog strategy to grow your business. 

What is a blog? 

In short, a blog is a collection of articles on your website. Its content mainly revolves around topics related to your products and business. Some popular content angles include:

  • Inspirational stories
  • FAQs
  • How-to guide or Tips
  • Product review
  • Industry news
  • Funny posts or Meme

shopify blog

Why you should start a blog on Shopify 

We bet you are not fully aware of how just a combination of words and images can add so much value to your brand. If so, then keep reading to find out why investing your effort into a Shopify Blog is not a waste.

Blog posts help your website attract organic traffic 

You have built a great website selling quality products, but how can your potential customers come to your site among millions of others? One common answer of every store owner is Paid ads. However, paid ads are not always affordable and guaranteed success, especially for eCommerce newbies. 

With Shopify blog, you can leverage the power of keywords and optimize your site for SEO – all FREE OF CHARGE. If you provide useful and relevant content through your website, it will get indexed well and rank higher when customers search for keywords related to your business. Consequently, your chance of being found on the internet will increase. 

Moreover, once your visitors like what you write, they will share it with their network via social media or word of mouth. Either way, it will drive organic and sustainable traffic to your online store. 

shopify blog

The audience will have a better understanding of your business

Gone are the days when businesses only needed quality products or services to succeed. To survive and stand out from the competition, a brand needs purposes, stories, and a communication message. Adding a Blog section is one of the most obvious and genuine ways to show your brand’s personality. 

Your blog’s content may vary depending on the nature of your business and marketing objectives. For instance, if you sell healthy food and want to inspire your visitors, you can write about nutrition facts, tips for better health, or guides to a positive lifestyle. Meanwhile, if your products are complex like machines or electronic equipment, you should provide articles on how to use function the products properly. 

In short, an updated, relevant, and useful Shopify Blog helps people to know more about your business and consider your brand as a trustworthy one. 

Customer engagement is also worth mentioning

Typically, users will scroll through a website, drop in the middle of their journey before placing any order. 

A Shopify blog can prolong their time on your website. The longer they stay, the more likely it you can will turn them from potential to actual customers. You can also use a “call to action” button or anchor link that directs them to a relevant product page while they are immersed in your content. 

Another way to better engage with your customers is through newsletters or email subscriptions. Regular news sent straight to your email inbox is definitely a great way to keep your customers up-to-date with your latest blogs, promotions and other news.

shopify blog


Let’s move further with our step-by-step guide to Blogging on Shopify!

How to start a Shopify Blog (4 steps)

Step 1: Set SMART goals

First things first, you need to determine what your goal when starting a blog on Shopify is. Is it to attract new visitors to your newly launched website? Or is it to communicate about a new project? Additionally, utilizing free OKR software can help you set clear objectives and track progress effectively as you refine your blog strategy.

Next, make sure your goals are clear enough for you to develop a detailed action plan. In short, you should remember the rules with the acronym: 

S – Specific

M – Measurable 

A – Attainable

R – Realistic

T – Timebound

shopify blog

Step 2: Develop a Content Plan 

Mapping out a content plan is the next step in realizing your dream blog. 

You may have different approaches to building a Shopify blog depending on your goals. If you want to attract more organic traffic, then including frequently-searched keywords will be a good idea. If you realize that customers need more information about your product or service, then having more how-to guides will be a bonus point.

Typically most sites will have a combination of several post types that serves different purposes. We recommend you brainstorm as many ideas as possible, then divide them into categories and give them an appropriate slot in your content timeline. 


Step 3: Add a Blog section to your Store

Now you have all the ideas, let’s bring your Shopify blog to life. To get started, you need to add a blog section to your store so that visitors can find your blog. 

Bear in mind that you don’t necessarily have to name the section “Blog”, you can use other terms with the same expressions like Knowledge, Insights, …

Here’s how to add a Section from your Shopify store backend 👇

First, go to your Shopify store, look for the Online Store section on the left bar, then choose Theme. Next, choose Customize.

shopify blog

Then you can click on the Add section button and choose Blog posts.

shopify blog

Great! Now the blog section is added to your store. Let’s write your first blog. 

Step 4: Create your Shopify Blog Post

Go back to Online Store -> Blog Posts and choose Create blog post. 

shopify blog


Now you can fill in Title, Content, Featured Image, and customize other details to complete your blog. Remember to press Save when everything is done. 

shopify blog

Tips to create a highly engaging Shopify Blog

Focus on quality content and visual elements

The essence of a blog lies in its quality content and image. Besides relevant content in the body text, you should write intriguing headlines and intros that visitors can’t help but click.  

Moreover, as humans are highly visual creatures, a blog with many appealing illustrations will definitely give a better effect on us. A better way is that you design your own images, to sum up or explain your points. Try to avoid the use of low-quality images as it will negatively affect users’ reading experience and their perception of your blog.

shopify blog

Use internal and external links

Linking to other articles or pages on your website can help readers quickly reach other content in the same cluster they are interested in. In addition, when doing so, Google receives signals about the relationship between your pages and improves the indexing of your website. 

On the other hand, linking externally to trusted sources not only provide visitors with more resources to read, but also enhance your credibility. 

Promote your blog on social media

You can solve the content block on social media by adapting from your blog and having your blog promoted for free, killing two birds with one stone. 

Online communities like Facebook groups with people of the same interest are also lucrative land for you to share your blog posts and expand your customer base. 

Let’s take a look at how Neil Patel leverage social media to promote his digital content

shopify blog

Optimize your blog for SEO

As I’ve mentioned, blogging is one of the best SEO tactics blogs. Here are some of our advice:

  • Do research to find out frequently searched keywords
  • Include relevant keywords in your writing
  • Create compelling meta descriptions to attract clicks
  • Remember to write subheaders to guide your readers

If you still don’t know where to start with SEO, then Shopify SEO apps can be a great partner that can support you with all the related tasks. 


Learn from the brilliant ones

Knowing some outstanding names to learn from is never a bad idea, especially if you are just getting started. We’ll provide you with some brilliant Shopify blogs by category:

However, it is paramount that you only notice their strengths and consolidate what you can apply to your site. DON’T COPY their content! Customers and Google bots both prefer authenticity, so using your own stories and voice is the best approach. 

Level up with Shopify blog Strategy Expert

Needless to say, the Shopify blog is a game-changer for every online business owner. Therefore, it is highly recommended that you take advantage of these our Shopify marketing expert to optimize your blog section. Check out our Shopify Agency and explain your needs right now. 

Final thoughts

It is undeniable that your business will benefit from a well-built Shopify blogs. In this post, we’ve provided you with the all necessary guidelines and tips on how to start creating engaging content on your website. We hope that now you are fully aware of the importance of blogging and will invest a substantial amount of effort into this part. 

However, there is no one-size-fits-all approach to building a successful blog. Learning from both success and failure may be the best guide for you to master the art of blogging.

Further reading 📚

Tags:

Author: Wail Amrani

Wail is a Shopify Expert & eCommerce Growth Consultant. Former digital marketing manager at Shopify I’m helping brands & retailers build 8-figure eCommerce. I’ve been leading digital growth for both online and retail brands for over 7 years.

How To Speed Up Your Store In 2022 Using CDN Shopify?

How To Speed Up Your Store In 2022 Using CDN Shopify?

CDN Shopify

What is CDN Shopify?

Content delivery network or CDN Shopify is the approach utilized by a lot of website proprietors to solve the problem of latency. Latency describes the length of time it considers material to be delivered after an internet request has actually been sent from a web visitor.

The major problem is that the further a web visitor is, the longer the travel of the web request will be. Additionally, if there is high web traffic, the beginning web server can take a while to react to all demands. Because of this, it leads to high latency and also slow-moving web page loading time.

For people with Shopify stores, that is not an appropriate result. Their sales are heavily reliant on having people stay on their internet site and also rapid loading time is a key part of that. The good news is, CDNs can aid with that!

How Can Shopify CDN URLs Help For Bulk Uploading Media Data Files?

If your store gets on the Shopify system, then you’re making use of the CDN Shopify to host your pictures on free image hosts, PDFs, and also various other electronic assets. When you add an item photo to your item pages, embed a photo in your item summaries, or include photos to your blog. All of those images are hosted on Shopify CDN to enhance the speed and delivery of those pictures on your internet site. 

How To Add Assets To the CDN Shopify?

When you’re logged right into your Shopify admin, you can directly go to Setting in the lower-left hand corner. After that click on the “Files” area on the settings display.


CDN Shopify


Inside the data location, you can submit as numerous files as you desire. Currently, Shopify does not have a limit regarding how many electronic properties you can upload and also host on their platform. You have accessibility to the URL so that you can utilize the image for various useful tasks like uploading products to various other market channels like Amazon.com, Walmart, or even make use of the image inside your email trademark.

CDN Shopify

Bulk Uploading as well as Hosting Embedded Pictures

When migrating your site to Shopify, you might have photos embedded on your existing website inside the item summaries or inside the body of your blog posts. Likewise, generally, some product types have PDF item handbooks installed on the web page. This simply implies the URL is included in a word or an image in the web content, making it very easy for the customer to either see the picture or download the handbook. This sort of embedding is not structured in the database in such a way that it can be moved over quickly.

The solution we make use of in our migration jobs at Pelican Business is to capture all the item data, blog site information, and material page data, in both plain text as well as HTML layout. We then make use of a device to scratch through the information for URLs, and afterwards, we bulk download the photo documents or PDF documents. Given That the CDN Shopify link is one-of-a-kind to the Shopify shop, we bulk upload those documents to the CDN Shopify inside this “Data” settings page. We then re-map in bulk all the brand-new Shopify CDN Links, as well as the web content displays properly, as well as when you shut down your old server, there will be no concerns with your content displayed on your pages. This is a common problem for migration solutions that make use of an application or plugin to move your data. Yet we have resolved the concern by providing a full movement for all format types.

Author: Wail Amrani

Wail is a Shopify Expert & eCommerce Growth Consultant. Former digital marketing manager at Shopify I’m helping brands & retailers build 8-figure eCommerce. I’ve been leading digital growth for both online and retail brands for over 7 years.

CDN Shopify Link URL Format

The CDN Shopify URL is distinct to the certain Shopify store itself. That makes uploading and hosting for bulk edits much easier when using the data to migrate ingrained assets or when working with Amazon and also Walmart submitting projects. Right here is an example of what a CDN Shopify  URL appears like:

https://cdn.shopify.com/s/files/1/2779/6736/files/rolled-bathroom-towels.jpg

The very first part of the link is Shopify account-specific: https://cdn.shopify.com/s/files/1/2779/6736/files/

The last part of the link is the name of the documents you uploaded: rolled-bathroom-towels. jpg.

Another circumstance this is useful is when a provider offers you a spreadsheet with product information however no organized picture URLs. They have a recommendation for the picture data name in the spreadsheet. Then they supply you with a folder of images. You can dump those pictures right into your CDN Shopify area, that add the CDN Shopify link in front of the picture reference name in your spreadsheet, then upload utilizing that link and you’re prepared. Any system out there like Amazon.com, Walmart, and even Shopify will certainly accept that property URL and download and install the picture right into their system the first time you post the documents.

If you need any kind of help bulk transferring information with ingrained pictures, PDFs, or various other properties, or you need help with the Shopify CDN, then reach out to us anytime, and also we’ll be happy to assist.


Exactly how CDN Shopify can assist your Shopify Store?

As one of the leading CDN companies in the market, you can be sure that you will certainly get a leading solution from CDN Shopify in your pursuit to give the best internet experience to your visitors while prolonging the reach of your website globally. 

If you are not encouraged, right here are some of the advantages you will obtain when you subscribe to CDN: 

High-Performance Website with CDN Shopify

Through a reputable CDN Shopify, your internet site’s web pages and its aspects, consisting of HTML, CSS, images, videos, and JavaScript documents are maximized for faster loading. Furthermore, this top CDN Shopify carrier additionally enhances your websites to ensure that it does not take excessive data transfer to download and install big data like images and also video clips.

Shopify CDN Helps The Global Reach

CDN Shopify also assists you to expand your website’s reach with PoP web servers worldwide. With these, your Shopify site clients will all have the same rapid as well as pleasant internet experience, whether they are within the closeness of the host origin web server or midway around the world. 

Protected traffic from DDoS attacks

CDN Shopify employs various mitigating tools to fight DDoS (Distributed Rejection of Service) as well as various other kinds of web attacks. This consists of supporting TSL certifications for high-level web traffic verification. As a matter of fact, CDN Shopify  is simply among a handful of CDN Shopify service providers that support all 5 major TLS expansions like HTTP/2, OCSP Stapling, Dynamic document sizing, ALPN, and Perfect ahead secrecy. 

IPV4/IPV6 Twin Stack

Aside from extending your reach worldwide, CDN Shopify additionally intends to expand your site’s reach to various devices. This top service provider uses the current IPV4/IPV6 dual-stack network that allows your web pages to be delivered to smartphones along with traditional end machines like computers as well as laptops. 

Conclusion

There are lots of advantages to making use of a CDN Shopify,  your picture files are automatically distributed to servers throughout the world and afterwards, the webserver closest geographically to your client sends the photo (believe it or otherwise, regardless of how fast the web is, taking a trip long distances can include little delays that can accumulate quickly). 

Images can also be cached, or temporarily saved on web servers within the CDN Shopify, which can likewise improve loading times. 

Normally setting up a CDN is intricate. However, with Shopify, it’s all dealt with for you without calling for any kind of changes to just how your website is coded or set up.

You can get the help of our Shopify marketing expert if you want to optimize your store or increase your ROI!

Tags:

Shopify Speed Optimization

Shopify Speed Optimization

Introduction

Shopify speed optimization is one of the utmost facets that Shopify store owners should take into account. A slow-loading website leads to a high bounce rate, low user engagement, less traffic, and thus, a diverse impact on your sales. If your site speed and page performance are decent, they boost your site’s SEO, enhance the user experience (UX). After all, they advance your search engine rankings.

In this article, I will guide you on how to make your Shopify outshine other sites with its high loading speed.

Before diving deeper into how to optimize your Shopify store performance, check out this video about Shopify Review to know more about this amazing platform! 

Top Quick Shopify Speed Optimization Checklist

Here come 8 proven ways through which the loading time and speed of a Shopify store can improve. These methods can help store owners to retain customers and attract new buyers by having a Shopify site with fast-loading speed.


Shopify Speed Optimization


1. Optimize Images and Videos

A large volume of unoptimized images and videos is frequently the most popular reason for website slowness. There are 4 solutions that you might want to consider as follow:

1.1. Compress and Merge Images

Compressing large images is one of the most efficient ways to speed up Shopify site. In particular, TinyJPG or TinyPNG are good options for you to compress the size of images without decreasing quality with lossless compression.

you can remove backgrounds from images, which not only helps reduce file size but also allows for a cleaner look that enhances visual appeal.

Or else, when uploading many different images, which demands loads of the server’s image requests, you can choose image consolidation. It helps to merge many distinguished icons and thumbnails into one, called “CSS Sprites” or “CSS Image Sprites”. You will subsequently well perform your Shopify speed optimization. 

1.2 Employ Lazy Load Images

eCommerce websites are packed with numerous pages. When customers click on the website’s link, the browser needs to get in action and download all the available content on the pages to get ready to browse the web pages. Hence, loading all the content takes a fairly irritating time.

With Lazy-loading, the problem is skillfully solved. It functions based on the principle of demand and supply. The browser will only load the content that visitors first see, in other words, above-the-fold content. The content below the fold will not be shown unless the customer scrolls down.

As the browser does not need to load the whole website content at once, it helps to solve your question of how to speed up Shopify website.

1.3 Apply Deferred Video Loading

Videos are similar to images in this regard. Deferred Video Loading is technical  performance that helps your site to load faster by deferring the loading of video resources until they are required.

We have a Shopify speed test using this technique. This saved 4MB of page weight and contributed to the page loading .65 seconds faster.

– SpeedBooster, 2021

1.4 Replace GIFs with Static Images

We cannot fail to mention replacing GIFs with motionless pictures when executing Shopify speed optimization. GIFs can be seen as a valuable asset for customers’ experience. It mesmerizingly improves your Shopify speed in terms of UX and branding.

However, be aware that these files are particularly large, a GIF image possesses multiple frames. Thus, the longer the duration, the more frames it comprises. Within 2 seconds of video, your GIF could bear 20 or even more images. These files are remarkably added to your site weight, therefore, website experts highly recommend switching them to static images where possible.

You can contact our Shopify agency London for any help 

2. Choose Proper Fonts

One of the most notable factors that you cannot exclude to conduct Shopify speed optimization is proper fonts. Shopify’s font library contains a collection of fonts such as system fonts, Google fonts, and licensed fonts from Monotype. All of these fonts are freely available to use on all Shopify online shops.

Be noticed that if you use fonts that do not exist on your customer’s computer, it would be irritating that your customer needs to download new fonts to have the text displayed.

Shopify Speed Optimization

In order to steer clear of downloading new fonts to your customer’s computer, you might want to think about using system fonts. A system font is known as a font that already existed on most computers. There are a bunch of options you can choose such as mono, serif, or sans-serif families. Among these families, you can also use any of the font styles from which, like bold, and italic.

The typeface that appears on your customer’s computer is determined by the operating system they are using. When you choose a system font family, you can choose from a variety of typefaces to render text:

  • Mono fonts: Menlo, Consolas, Monaco, Liberation Mono, or Lucida Console.
  • Sans-serif fonts: BlinkMacSystemFont, Segoe UI, Roboto, Ubuntu, or Helvetica Neue.
  • Serif fonts: Iowan Old Style, Apple Garamond, Baskerville, Times New Roman, Droid Serif, Times, or Source Serif Pro.  

3. Remove Unnecessary Shopify Apps

It cannot be denied that Apps are handy, useful, especially if you are not tech-savvy and have no prior experience with coding.


Shopify Speed Optimization

You may add more functionality to your Shopify website by installing apps that meet your needs. An eCommerce store owner, for example, can download a live chat app rather than create one from scratch.

However, be aware that these apps add load to your website, even if you are not using them. These apps have a lot of JS and CSS files that run in the background and negatively impact your Shopify speed optimization.

Therefore, it’s important to frequently review all of the apps that you are using. Then, there are two simple steps you can follow:

  • Disable app features you no longer use or remove the ones that do not apply to your store. Make allowance for online store features and speed optimization.
  • If you are deleting an app, think about removing any code that was added during the installation procedure. Some apps assist you in this procedure by enclosing their code in {% comment %} tags that include the app name.

Deleting unneeded app code prevents running code for features that aren’t used and makes your theme code easier to comprehend.

  • Ask for a consultancy from your app developer
  • Get further help by hiring Shopify professional

Note: Admin-only Apps like the Shopify Local Delivery app don’t impact your store speed.

4. Update/Download Speedy & Responsive Shopify Themes

Shopify Themes comprises Liquid, HTML, CSS, and JavaScript code. These file sizes can grow as you edit or customize themes and eventually, affect your Shopify site speed.


shopify speed optimization: themes


If you install a new theme, always check the following:

  • Opt for a speedy & responsive theme.
  • Check for the up-to-date version of your theme as well as the theme’s live preview. Run the theme preview page through Google PageSpeed Insight to see what improvements can be made to optimize your site’s speed.

If you detect something in your theme that is causing your online store to slow down, do the following steps:

  • Disable any themes that you no longer use. Consider how to strike a balance between features and speed in an eCommerce website.
  • Use a system font where possible.
  • Ask for a consultancy from your app developer. In the case of using Shopify’s free theme, you can get help from their technical support team. You can contact your theme developer or hire a Shopify professional if you are using a third-party theme.
  • Install a performance-optimized theme, like Dawn, is never a smart option.
  • Get further help by hiring Shopify professional.


Shopify Speed Optimization

Repeatedly performing complex operations can slow down your Liquid render time, harming your overall store speed. If you’re concerned that your code isn’t optimized, use these instructions:

  • Hire a Shopify professional to assist you in identifying inefficient or unused code.
  • Use the Shopify Theme Inspector for Chrome to find the lines of code that are slowing down pages in your online store. 

5. Harness AMP

Another solution for Shopify speed optimization is Mobile Accelerated Pages, or AMP, a standard framework that permits merchants to develop mobile-friendly web pages loading speedily.

Smartphones have evolved from a luxury product to a necessity in today’s fast-paced world. In this era of digital technology, people no longer use cellphones solely for communication, they take online classes, transfer payments, surf websites, go online shopping, and such.

Take a gander at the statistics (updated by Statista) below to see how important it is to improve the user experience for mobile visitors:

  • In 2021, smartphone subscriptions have surpassed 6 billion worldwide, and are expected to increase by several hundred million in the coming years.
  • Mobile-commerce is projected to generate 72.9% of all retail e-commerce in 2021, up from 58.9% in 2017.

Therefore, it’s high time that Shopify store owners consider AMP. Unless your website loads speedily or functions well on mobile devices, you might lose a bunch of prospects. Thanks to this framework, customers will be able to visit your website much more quickly. Many apps such as 4-star ratings FireAMP or RocketAMP are available on the Shopify App store to assist you in creating AMP pages. Or else, you can consider building the Shopify API to develop these AMP pages.

6. Organize All Tracking Codes with Google Tag Manager

Data collecting from your site is necessary to get more insight into your clients’ behavior, but it can lead your website to slow down.

When you measure conversions, goals, and retargeting independently, all of those tracking tags add to the number of requests on your page, which might hurt its overall speed at the end. They can also prevent the page’s content from rendering if they aren’t done asynchronously.

You may condense all of your tracking tags into one JavaScript request using a management solution like Google Tag Manager. They allow you to handle various store tags with only one snippet of code. Check out this guide for further information on how to use Google Tag Manager with your Shopify store.


7. Minimize Redirects & Broken links

In order to conduct Shopify speed optimization, your site may happen to meet a bunch of redirects and broken links. Hereby are the ways for you to avoid the unwarranted:

7.1. For Redirects

Unwanted redirects stifle website performance and slow page load times. This, in turn, has an impact on the overall loading time of the website.

Broken link 404/301 Redirect is a smart solution to choose, developed by Giraffly. It helps to:

  • Identify 404 error pages
  • Prominently shows all broken links in the app’s dashboard. Additionally, you can receive reports by mails.
  • Easily generate 301 URL redirects. All you have to do is set up a redirect pattern, and the software will take care of the rest.

7.2. For Broken Links


404

Users will certainly be put off by this message. Hence, don’t be the brand that irritates users and drives them away. To avoid making needless HTTP queries, use free online tools like Dead Link checker to detect broken links on your website and then update or eliminate them.

Broken links harm SEO. When a user lands on a page that isn’t available, he pushes the back button on his browser. This increases the bounce rate of the website.


8. Check Your Store Speed Performance Through Google Pagespeed Insights

Before jumping to the solution, let’s answer a question: What is a good Shopify speed score? Your Shopify speed score is based on how well your store runs in a Google Lighthouse test environment. Over 50 is regarded as a respectable Shopify speed score, while over 70 is considered excellent!

Our recommendation to check your store performance is to use Google PageSpeed Insights to evaluate your web pages and find the parts of your website that increase the loading time, then work on the provided suggestions to minimize loading time and enhance website speed and performance. Additionally, to get a deeper understanding of your site’s performance, it’s useful to run a website speed test to identify any specific issues affecting your site’s loading times.


Shopify Speed OptimizationGoogle PageSpeed Insights reveals the following key factors for mobile and desktop websites:

  • Minimize CSS and JavaScript
  • Optimize images
  • Delete render-blocking CSS and JS in the above-the-fold web page content
  • Decrease server responding time
  • Make use of browser caching
  • Redirects to landing pages should be avoided at all costs
  • Compress

Using Google PageSpeed to analyze your website’s performance might be the best Shopify speed optimization service that helps you find the aspects slowing down your site. 


Why Does Shopify Page Speed Matter?

eCommerce success depends on the speed of your website. And, with impending changes to Google search ranking in May 2021, online performance will become even more critical as a competitive advantage.

Let’s take a look at the following factors:

  • Increase Conversion

Lower bounce rates and increased conversions have been connected to conversion fast websites. According to Google, a one-second increase in site speed can boost mobile conversions by up to 27%. With 70% of shoppers purchasing on their mobile devices, site speed surely has a significant impact on your earning potential.

A one-second increase in site speed can boost mobile conversions by as much as 27%.

  • Build Customer Loyalty

You may have heard: “It’s cheaper to get current consumers to make a repeat purchase than it is to get new customers.”

This is where site speed comes into play. According to Skilled, 79% of customers are less inclined to repurchase from an online business if they are “dissatisfied” with the site’s speed (i.e., if your site is fast, you’re more likely to obtain repeat customers).

  • Improve Google Search Ranking

More potential clients will find your business if you rank higher on search engines like Google. Google, the most prominent search engine, uses site speed as a ranking component for search results. Faster sites will rank higher on Google, making new clients find them easier.


FAQs about Shopify Speed Optimization

#1: How to Improve Shopify Store Speed?

Bear in mind these 8 key factors as follow:

  1. Optimize Images and Videos
  2. Choose proper fonts
  3. Remove unnecessary Shopify Apps
  4. Update Shopify Themes
  5. Harness AMP
  6. Organize all tracking codes with Google Tag Manager
  7. Minimize Redirects & Broken links
  8. Check your store speed performance through Google Pagespeed Insights

#2: How to Find out What Shopify Theme a Website Is Using?

The purpose of determining which Shopify theme is being used is to discover the Shopify theme name or IDs. As a result, you can learn more about it and locate it for yourself. To detect a store’s Shopify theme, there are 2 ways:

  1. Search the source code manually
  2. Use a browser extension to do it for you 


Conclusion

We hope this article helped you understand and learn how to perform Shopify speed optimization. We have highlighted 8 powerful ways that you can apply and follow to achieve high-speed performance.

Shopify stores are designed to make the shopping experience easier and richer for the customers. The features when not applied properly may lead to a slower website. 

You may join our eCommerce community to get more useful tips for your online business. Also, if you’re thinking about switching to Shopify, check out Shopify marketing strategy for the most effective option!

Wail Amrani is a Shopify Expert & eCommerce Growth Consultant. Former digital marketing manager at Shopify I’m helping brands & retailers build 8-figure eCommerce. I’ve been leading digital growth for both online and retail brands for over 7 years.

Shopify Shipping Review 2022

Shopify Shipping Review 2022

At the end of the day, it is the customers who have to pay for the shipping fees unless you offer them free shipping. Hence, the lower the shipping cost you have to handle, the more competitive price you can offer your customers, which helps you gain an edge over your competitors in the long term, especially if you’re merchandising price-sensitive products.

If you are considering paying a monthly subscription for Shopify, then one of the crucial aspects you should take into consideration is how to ship your products to customers with Shopify? 

In this article, we’ll give you a complete guide to Shopify Shipping – What is it? How much does it cost? Shopify Shipping’s Main features and Best Practices for Shopify Shipping.

Scroll down for more! 

What is Shopify Shipping?

Shopify Shipping is a built-in shipping toolset Shopify offers you when you pay a monthly subscription to run your online store with it. 

So what does this shipping toolset include? 

To name some, Shopify Shipping helps merchants to calculate real-time shipping rates; purchase & print shipping labels in their Shopify admin dashboard, and shipment tracking

Shopify Shipping  
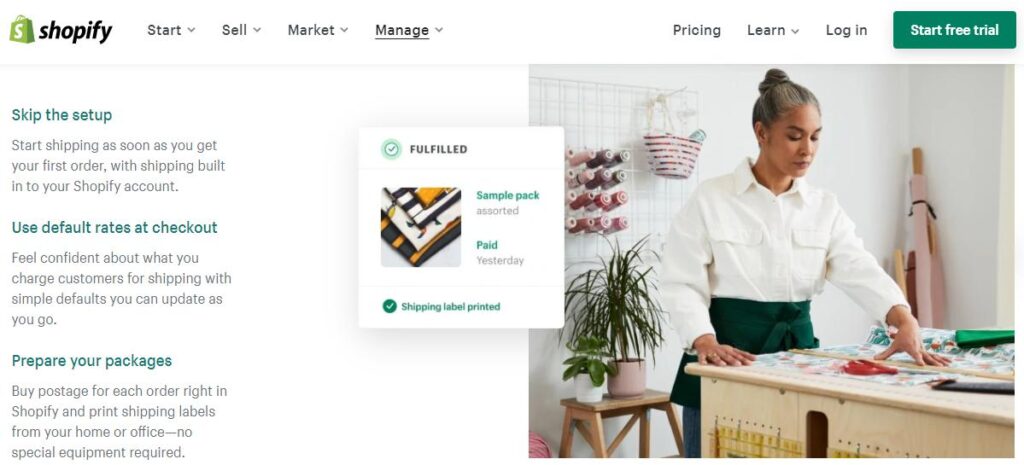
Shopify Shipping is a built-in shipping suite you get when choosing a Shopify plan

Before we dive deeper into all the bits and pieces of Shopify Shipping, we have one good news and one bad news to inform you.

Woohoo, Shopify Shipping is FREE on ALL pricing plans! 

Hold on, but how about the bad news though? Well,… unfortunately up to the present, Shopify Shipping is only available for orders shipped from the US and Canada.

How does Shopify Shipping work?

Shopify partners with major carriers such as USPS, UPS, DHL Express, Canada Post, etc. to offer Shopify users discounted rates on various shipping services. These discounts often vary from around 20% to 50%. However, they can sometimes go all the way up to 88%

When you gain access to these shipping rates, you can list real-time shipping rates for your customers at the checkout stage. This helps reduce unexpected delays or hidden shipping costs, thereby reducing your cart abandonment rate significantly.

Shopify Shipping

This is an example of listing real-time shipping rates for your customers 

Besides leveraging Shopify Shipping to list real-time shipping rates, Shopify Shipping also comes up with several features that can help smoothen your order fulfillment process. 

Particularly, you can process orders and print shipping labels in bulk within your Shopify store. Other international shipping tools can also be utilized in case you want to create & print your branded forms and let customers access tracking info during the shipping process.

In a nutshell, it’s a blessing if you reside in a country where Shopify Shipping is available because it offers bunches of robust shipping functionalities at zero cost. 

How much does Shopify Shipping cost?

As mentioned, Shopify Shipping is a free built-in feature you have along with your Shopify store, meaning you can be worry-free about any extra fees.

And that makes Shopify Shipping a sweet deal compared to other shipping apps, which usually cost you up to $100/month depending on the total of orders you ship monthly or the level of customer support you receive. 

All Shopify users can benefit from the reduced shipping rates when choosing USPS, UPS, DHL Express, and Canada Post as your carriers. However, the higher you go in the pricing ladder, the more generous this discount can be. 

Since this rate varies from carrier to carrier, here are all the shipping rates that are now being offered by the 4 major carriers- USPS, UPS, DHL Express, and Canada Post.

NOTE: If USPS or DHL Express is your final choice, jump straight to the Shopify Shipping calculator so that you can see for yourself the most accurate shipping costs you have to pay.

Choose your Shopify Plan (Basic Shopify / Shopify / Advanced Shopify)  > Fill in shipping destinations > Specify your package size & weight > hit ‘Calculate’ 

Shopify Shipping calculator will offer you discounts from the cheapest to the most expensive as shown below:

Shopify Shipping 
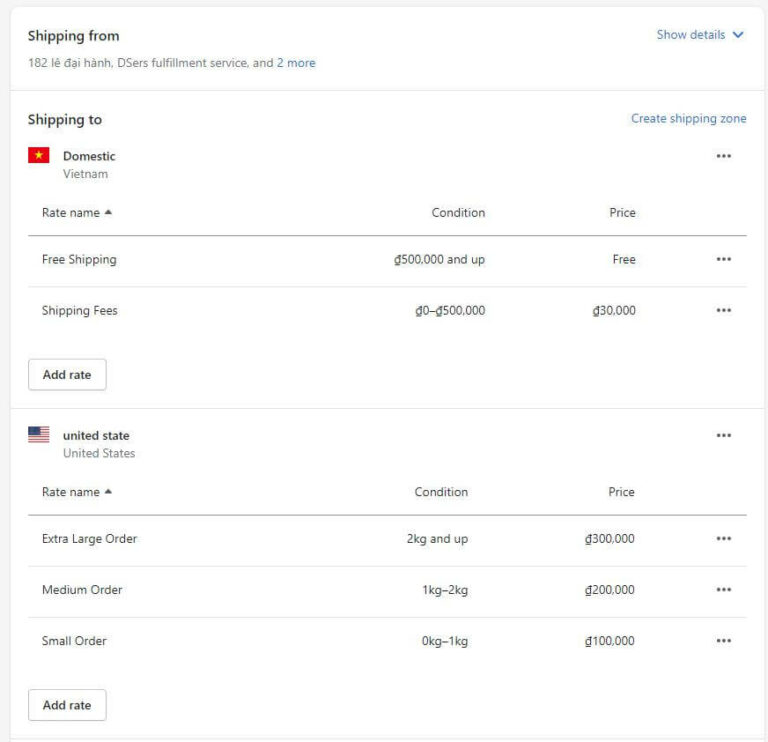
The calculator will show you multiple shipping options by DHL Express & USPS for you to choose from

United States Postal Service (USPS)

The United States Postal Service (USPS) is one of the best shipping carriers you might love to count on if you want to ship lightweight, less-urgent products from the United States.

This shipping carrier has up to 6 shipping options for merchants to ship their products domestically within the US sovereignty and 3 international shipping choices for those who need to ship their products to the global marketplace. 

In particular, here are all the USPS shipping options you may love to take a closer look at:

Domestic Shipping Services from USPS 

  • Priority Mail: 1-3 business days
  • Priority Mail Express: 1-2 business days
  • First-Class Package Service: 2-3 business days
  • First-Class Mail: 2-3 business days
  • Parcel Select Ground: 2-8 business days
  • Media Mail: 2-10 business days

International Shipping Services from USPS

  • First-Class Package International Service: Delivery timeline varies
  • Priority Mail International: 6-10 days
  • Priority Mail Express International: 3-5 business days

Although we want to give you detailed shipping costs and fees for you to prepare yourself, this is not possible since your shipping costs will depend on other key factors such as packaging weights, sizes, departure and destination points, insurance included.

Hence, here is an example of how much you’d save with USPS when shipping a package less than 30 oz.

   Walk-in rate  Shopify Shipping rate  Savings
 Priority Mail
 New York to Chicago
 $10.90  $7  28%
 Priority Mail Express
 New York to Chicago
 $42.75  $36  15%
 First-Class Package International Service
 New York to London
 $24.5  $22.8  6%


United Parcel Service (UPS)

If your products are time-sensitive, you may love to opt for UPS– a carrier that is well-known for fast shipments and guaranteed delivery. United Parcel Service offers powerful order-tracking functions and guaranteed delivery on super fast shipments such as Next Day Air.  

This carrier offers a wide variety of shipping options. But only a few of them are available with Shopify Shipping. The lucky thing is that these shipping options include both domestic and international services which allow you to save up to 70% on shipping rates.

Let’s take a look at the UPS shipping options you’ll have with Shopify Shipping

Domestic Shipping Services from UPS

  • UPS Next Day Air: Next business day
  • UPS Next Day Air Saver: Next business day (afternoon)
  • UPS 2nd Day Air: 2 business days
  • UPS 3 Day Select: 3 business days
  • UPS Ground: 1-5 business days

International Shipping Services from UPS

  • UPS Worldwide Express: 1-3 business days (morning)
  • UPS Worldwide Saver: 1-3 business days (end of the day)
  • UPS Worldwide Expedited: 2-5 business days
  • UPS Standard to Canada: Day-definite by the date scheduled

Similar to USPS, shipping fees vary depending on the package’s weight, dimensions, etc. So here’s an example of how you’d save when you ship through UPS with Shopify Shipping:

   Walk-in rate  Shopify Shipping rate  Savings
 UPS Ground
 New York to Chicago
 $17.26  $8.08  53%
 UPS Next Day Air
 New York to Chicago
 $84.89  $35.27  58%
 UPS Standard to Canada
 New York to Toronto
 $30  $16.53  44%
 UPS Worldwide Expedited
 New York to London
 $121.28  $36.06  70%


DHL Express

If you sell globally, DHL Express should be a top-of-mind choice to ship time-sensitive orders to customers in more than 220 countries and territories. Thanks to the customs forms and guaranteed international delivery, DHL Express does make sense for your international shipments.  

A perk when you choose to ship via DHL with Shopify Shipping is generous discounts up to 74% on shipping labels. 

Unfortunately, DHL only offers one international shipping option for Shopify Shipping users:

International Shipping Services from DHL Express

  • DHL Express Worldwide: 2-3 business days (regardless of destinations)

As mentioned above, each package should have different shipping fees due to the differences in package size, dimensions, and final destination, here is just an example of how much you would save with DHL Express as an eligible Shopify Shipping user. 

The rates below will be applied with a sample 1 lb shipment on the Shopify plan (the discount will be a bit more generous for Advanced Shopify and lower on the Basic Shopify).

 Walk-in rate  Shopify Shipping rate  Savings
 DHL Express Worldwide
 New York City to Toronto
 $93.55  $26.7  71%
 DHL Express Worldwide
 New York City to London
 $121.7  $37.72  69%
 DHL Express Worldwide
 New York City to Sydney
 $131.3  $42.15  67%


Canada Post

Similar to USPS in the United States, the Canada Post is Canada’s national carrier service. If you reside in Canada and want to leverage Shopify Shipping, Canada Post is your one and only choice. This is a great option for sellers shipping domestically within Canada or internationally to the US.

You can save up to 53% when using Shopify Shipping to purchase shipping labels from Canada Post. Plus, just like UPS, Canada Post also comes with robust tracking features so that your customers can keep track of their orders. However, it should be noted that Canada Post only supports shipping labels with boxes and soft packages, meaning you cannot use Canada Post for envelope-type packages. 

Canada Post offers a number of different services with Shopify Shipping. They have domestic services and international services as presented below:

Domestic Canada Post Services

  • Expedited Parcel: 1-7 business days
  • Xpresspost: 1-2 business days
  • Priority: Next business day

International Canada Post Services: USA

  • Small Packet USA – Air: 5-8 business days; for small, lightweight packages under 1 kg
  • Tracked Packet -USA: 4-7 business days; for small, lightweight packages under 1 kg
  • Expedited Parcel – USA: 4-7 business days; for heavier packages under 30 kg
  • Xpresspost – USA: 2-3 business days

International Canada Post Services: The Rest of the World

  • Small Packet International: Surface (1-3 months) or Air (6-10 business days); for small, lightweight packages under 2 kg
  • International Parcel: Surface (1-3 months) or Air (12+ business days); for large, heavy items
  • Tracked Packet–International: 6-10 business days; for small, lightweight packages under 2 kg. Available to 31 countries
  • Xpresspost–International: 4-7 business days

Just like the 3 carriers above, shipping costs with Canada Post differ from package weight to dimension, origin, and destination. But maybe you’d love to look at the walk-in rate and reduced rates when using Shopify Shipping with Canada Post.

The rates below indicate the shipping fees of a 1-kilogram package from Toronto to Calgary, Canada:

 Walk-in rate  Shopify Shipping rate  Savings
 Expedited Parcel
 Toronto to Calgary
 $17.54  $15.44  12%
 Xpresspost
 Toronto to Calgary
 $24.65  $22.51  8.7%
 Tracked Packet USA
 Toronto to New York City
 $21.91  $19.93  9%
 Tracked Packet International
 Toronto to London
 $65.65  $49.79  24%


Shopify Shipping’s Main Features

Shopify Shipping

The ultimate guide to Shopify Shipping –

Apparently, Shopify Shipping provides sellers with almost everything they need to ship and fulfill orders. Although there’s still room for improvement in some current features, Shopify Shipping basically meets the demands of most merchants.   

Here is a summary of the features you’ll have with it:

  • Integrations With Major Carriers – Canada Post, DHL, USPS, UPS, Sendle, and Hermes.
  • Label generation – You can purchase & print up to 20 labels at a time. You can use a regular desktop printer or a supported label printer to print these labels.
  • Shipping Insurance – Shipping insurance through Shipsurance is only available to merchants shipping from the US. You can protect your shipped orders by buying up to $5000 of insurance coverage. You can add shipping insurance and file a claim within your Shopify admin dashboard.
  • Shipping option management – You can choose to set free or flat shipping rates or calculate rates based on weight and dimensions.
  • Tracking capabilities – Provide customers with real-time updates and tracking information.

How to set up Shopify Shipping?

Using Shopify Shipping can be a great way to streamline the shipping process for your eCommerce store. It’s simple to set up – all you need to do is follow these steps to implement it on your eCommerce store: 

Step 1: Add addresses 

Your business address is set as your default shipping location. If you want to ship from a different address, then edit it in the “Locations” section of your Shopify account settings.

Shopify Shipping

Settings > Locations > Click Add location or edit the default one. Note that you can add up to 8 shipping locations

Step 2: Choose your shipping carriers

Depending on where you’re residing, you can add carriers from USPS, UPS, DHL, or Canada Post. Choose which of the available options you’d prefer then tick the checkbox to make those services available on your checkout page.

Shopify Shipping

Step 3: Confirm your product weights and dimensions 

Remember to specify the weight for all your products. This is to make sure that the real-time shipping rates are accurate for all customers’ orders. 

Shopify Shipping

Make sure your product weights are accurately specified

Step 4: Choose your packaging 

Within the Shopify Shipping settings, you’ll also be able to select your preferred type of packaging. You can usually choose from envelopes, boxes, soft packs, and carrier-specific packaging depending on your budget and products. 

Shopify Shipping

Shopify will use the package’s dimensions & weight you input here to calculate real-time shipping rates

Step 5: Set up your printer and labels

Of course you have to pay for your shipping labels when using Shopify Shipping. But depending on your Shopify plan, you may access generous discounts from Shopify’s partner carriers. 

You can print your labels using a standard printer or a specialized label printer, depending on your preference and whichever you have access to. 

Apart from your desktop printer, Shopify Shipping also works with the label printers below:

  • Dymo LabelWriter 4XL
  • Rollo label printer
  • Brother QL-1110NWB label printer

Step 6: Determine your shipping zones 

And last but certainly not least, don’t forget to set up your shipping zones. 

Some Shopify sellers only ship to certain territories and you can also edit which shipping options are available for each of your shipping zones. For instance, you can offer free shipping for domestic orders that meet your pre-defined minimum order value.

Shopify Shipping

Once you’ve set everything up then you’re ready to begin fulfilling customer orders!

Wrapping up!

Briefly, that’s exactly everything you need to know about Shopify Shipping. Unfortunately, as of writing this article, Shopify Shipping and the awesome features that come with it are still geographically refined to some territories only. 

If you need the best Shopify marketing expert just click here.

.

How To Add Products To Shopify?

How To Add Products To Shopify?

 Introduction

After choosing Shopify as the powerful eCommerce platform to help you kickoff online business, definitely, you should start uploading your selling items to launch the store as soon as possible. Desiring to contribute to your effective store management, Atamgo will walk you through how to add products to Shopify within 7 easy steps.

Let’s get cracking!


How-to-add-products-to-Shopify


What is Shopify?


Shopify is one of the most popular hosted eCommerce platforms, allowing users to easily set up their online store and start the business. Because it is cloud-based and hosted, Shopify handles the complex source code and users do not have to obtain any technical skills to launch the business.

Get more insight with our detailed Shopify review – Is Shopify worth it in 2022?

Even during the 14-day free trial, store owners can still upload products to Shopify to test the platform without having to submit any payment card information.

Don’t wait any further, let’s get cracking on how to add products to Shopify!


7 Steps Of How To Add Products To Shopify:


7-steps-info

Step 1: Login To Your Shopify Account

Step 1 is the most effortless step as it takes you less than 1 minute to enter the account information and your store domain.

The most common problem users tend to meet is they forget the passwords. Don’t worry because you can receive the verification code via the registered email address. To avoid this time-consuming process, try to note down your passwords or let the browsing history remember it for you.

After filling in the account information, you will reach the dashboard which is only visible for admins. Here present the most important functions of Shopify:


Shopify

Step 2: Write The Product Details

In the next step, you can begin adding information to your product page. Details about your product will include several items:

  • Title: should be short and memorable in order to help both you and your customers to call the product name. The product title does not have to cover all the information about the product, because the details will be written in the Description part. Plus, be consistent in the way you name your products. If you contain the colour in one product title, you should do the same to others.
  • Description: must cover the emotional and rational reasons why customers should add the products to their cart. Keep in mind who is your target audience and list down how this product can help them. There’s a rich text editor in this section so use it to emphasize the important information and impress your customers.

Options: Tick the box of “This product has options, like size or colour” and then Shopify will show you the below blanks:


shopify-options


You can choose Color, Size, Material, and Size in the Option Name, and add values for each selected option. Many store owners ignore this section, however, a variety of options indicates the product diversity in your store, as well as helps the owners to easily classify products in the inventory.

  • Vendor: In this section, write your brand name if you sell your self-made products. Or else, write the name of the manufacturer or suppliers.

Step 3: Add The Images For Each Product

Product Image will directly affect customers’ buying decisions. A successful product image enables customers to imagine what’s the product like without touching it.

You should add multiple images of different angles for each product so that customers can have a full-fledged look into the product. Additionally, provide customers with the products in available colours. The photos should be taken in accordance with the concepts of your brand.

If you do not use your own photos, get permission before downloading and placing any images.

Similar to the product title, the Shopify product images should be named consistently. Try to use SEO keywords so that the picture also helps customers easily navigate your store via search engines.


Step 4: Create A Collection On Shopify

Adding Collection to your Shopify store has lots of advantages. It not only helps you to structure your website store but also upgrades the customer experience. Because when customers reach your store site, they will quickly find things they want to buy.

Remember that one product can belong to several collections. There are some common examples of collection: “Men T-shirts”, “long dress”, “vintage accessories”, and so on. The collection name should be based on the search behaviours of your customers.

You may be wondering how to add products to a collection on Shopify, here comes the guide!

There are two types of collections: manual collection and automated collection. Store owners prefer the automated type, as Shopify will automatically add all the products into their collections based on the conditions:


Some Shopify templates will allow you to add the collection’s image. If you don’t select a collection picture, the image of your collection’s first product will be used.


Step 5: Adjust Other Shopify Products Settings

There are several additional settings that you should pay attention to:

  • Pricing: Remember to set reasonable prices based on your brand positioning. When setting prices, you can also think about Discounts. Shopify allows users to set when customers can apply the discount code. For example, when customers buy a specific number of products, the discount code will automatically be applied.
  • Shipping: It’s critical to pre-set the most efficient shipping methods for your consumers. This must be set up before you receive the first order so that customers can select their preferred delivery method at checkout. Shopify offers three selections: shipping, local delivery, and local pickup. Depending on your business type, you can limit the number of available shipping options.
  • Product Reviews: You may add a customer review feature to your products with the Product Reviews app. This triggers customers to interact with your company and generates more sales.


Step 6: Optimize For Search Engines

SEO will determine the number of customers navigating to your store site. There are simple but important tips you should consider to follow:

  • Use Ahrefs or other SEO tools to know what your target customers are searching for. Make a list of high-volume keywords.
  • Insert the selected keywords into product names, internal links, and image names.
  • In the Shopify marketplace, find suitable Shopify SEO plugins to have the most SEO performance.


Step 7: Publish Products and View On Store

You have reached the final step! Remember to have a quick review of all the information you have added to the product before clicking the “Save Product” button.

The “View on your website” option helps you to see the preview of your product so that you can adjust if there are any issues. You can edit the products by returning to the first step.

How To Import Shopify Products?

If you have already placed your product information in another eCommerce platform, you may not choose to manually add products to Shopify. Instead, you may find a more convenient way to import products to Shopify.

There are two main importing methods. Initially, you convert the store data into CSV files. Then, edit them following the right format of Shopify. After that, upload those edited to the Shopify database. Though this is the most economical method, it takes you a huge amount of time to complete. Imagine if you have hundreds or thousands of products, you must rethink and look for other methods.

However, the 3-step process guide on how to import Shopify products manually has been provided so don’t forget to take a look.


online-business-ideas-featured-image-scaled-1


The second method is in favor of many store owners. In order not to waste time, they ask for Atamgo’s help. Let’s check out Atamgo the best Shopify agency London. Atamgo has experienced thousands of Shopify store management. Thus, if you want to facilitate the product importing process to Shopify, immediately leave it for the expert!

Not only products but also customers and orders can be automatically migrated to Shopify with only a few clicks. Noticeably. Shopify will immediately produce new URLs for your entities when you transfer from another platform to Shopify. As a consequence, your SEO rankings will suffer. That’s why  301 redirects should be used to secure your SEO rankings. Plus, if customers use the old URL, 301 redirects will automatically direct them to the new site.


How to Duplicate a Product?

Duplicating products will save a huge amount of your time when listing products in Shopify. Imagine you have manually added several products, and the next ones have similar features. “Duplicating product” is the most helpful function to use.

This step has nothing complicated. Only by clicking “Duplicate”, Shopify will generate the new product with the available settings. However, remember to adjust several necessary elements (especially product names and product images). Thus, you can still guarantee product diversity for your store.


Add New Products with Shopify POS

The Shopify Point Of Sales (POS) helps you to integrate the devices and allows users to manage the store even on your laptop, iPad or iPhone. Thus, you don’t have to be present in the store and can still check the order status.


Shopify Pos


Shopify POS is a must especially if you have more than one point of sales. Because it is the most convenient and systematic method to track the operations across retail locations.

Setting Shopify POS up is a simple task but requires your long-span attention:

  • Firstly, Shopify advises you to check your nation’s laws and verify whether Shopify POS is legal in your place or not.
  • Secondly, complete some basic settings such as the addresses and contacts of your retail locations.

  • Thirdly, add staffs’ accounts to the system so that they can do the daily updates.

List Products to Sales Channels

Listing Products to multiple sales channels will widen the reach of your products.

The Sales Channels button is at the left corner of your admin site. Click the “+” icon next to it and Shopify will recommend to you several popular sales channels below:


shopify-sales-channels

How to Delete Products on Shopify

Removing Products from your Shopify store doesn’t take a lot of time. Commonly, store owners delete products because they have decided not to sell the products anymore.

Remember that after clicking the “Delete” button, you can not recover the information about this product. Thus, if you are unsure about removing the product forever, you only need to hide the products. Hidden products’ information is not displayed in the front-end, but still stored in the back-end.

FAQs

1. What are the best Shopify alternatives?

Magento, BigCommerce, or PrestaShop, can be great Shopify alternatives.

2. Is Shopify good for beginners?

As you can see from our Shopify review, Shopify is a dynamic all-in-one solution to host and manage an online store that doesn’t take much muscle and technical expertise. Thus, it’s ideal for newbies and amateur users.

3. Does Shopify take advantage of sales?

The pricing fee of Shopify only includes the fees of monthly subscriptions and additional plugins.

4. How many stores can I have?

Shopify only allows users to have one store site per account. Thus, you have to create another account and operate the new store separately.

5. How to publish Shopify store?

First, you have to purchase a premium plan, then buy a new domain or link the existing domain to your Shopify store. After that, disable the front-end password by unchecking “Enable password”. Then “Save” to publish Shopify store.


Summary

Congratulations! You’ve just walked through a detailed guide on how to add products to Shopify. This is a simple stage, however, it is quite time-consuming. Thus, if you have the intention to add products not just on Shopify, but on other eCommerce platforms (like Amazon or Etsy), try to contact our Shopify marketing expert!

You may join our eCommerce community to get more useful tips for your online business. Also, if you’re thinking about switching to Shopify, check out Shopify marketing strategy for the most effective option!